Category: Speciality Sprayers

Main category for all sprayers that are not horizontal booms

  • Plumbing Projects That Make Spraying Easier and Safer

    Plumbing Projects That Make Spraying Easier and Safer

    Some of our biggest struggles in spraying involve the start and end of each spray day.

    When starting a new field after the sprayer is cleaned, we need to prime the boom. If it’s full of water, that water has to be purged and the question is always for how long and where to do this (pro tip at bottom of article).

    At the end of the day, we should ideally clean the sprayer. During that process, we may struggle with waste disposal, including large rinsate amounts, and course, the uncertainty of whether the job is actually done (since clean water looks exactly the same as contaminated water).

    If not cleaning the entire sprayer plumbing, we should at least rinse the boom, even if we’re returning to the same product the following day. It can prevent future problems.

    These tasks are complicated by the increasingly convoluted plumbing featured on modern sprayers. Ask someone to explain their sprayer’s plumbing system to you one day. It’s a long story! A bright spot is the well-engineered, compact, and accessible Agrifac system.

    Fortunately, virtually any sprayer can be modified to suit your needs. Let’s talk about a few ideas for a winter project:

    1. Boom flush. It’s good practice to flush clean water through your boom at the end of spraying even if the main tank remains full of product. Some sprayers have an air purge system to eliminate liquid from the plumbing and that is a great feature. A water flush should follow that purge so that any residual pesticide is diluted and removed before it can dry on and become hard to remove later.  First you’ll need a clean water tank on the sprayer (150 gal is enough). Second, plumb a feed so that this clean tank can be the sole source of the water supplied to the solution pump. Select this source, shut return lines down or off, and pump clean water through boom.  Sprayers that have an auto-rinse cycle will likely be able to draw clean water, but may not be able to push it to the boom, directing it to the wash-down nozzles instead. Check to see what’s possible, and make the changes you need.
    2. Clean water pump. Installing a second pump dedicated to the clean water tank has several advantages. We’ve talked about continuous rinsing before, here, and here, as a way to dilute the tank remainder faster. It requires installation of a second pump dedicated to clean water. Additionally, give this pump the option to deliver water to the boom, not just the wash-down nozzles. Now it can be used to rinse water through the boom. The main challenge is to obtain a pump capacity that can match the needs of the boom and/or the wash-down nozzles.
    3. Boom ends. We’ve mentioned this part of the boom many times. Boom ends must be flushed regularly to get rid of product and possibly debris that gets stuck there. A simple way to achieve this is to use the Express Nozzle Body End Caps from Hypro. These bleed air continuously, and also prevent accumulation of dead-end contamination. They do need to be flushed, and this can be done by pulling a plug or rotating the turret to an open (no nozzle ) position.
    1. Recirculating boom. This is a significant change, but worth considering. Conventional plumbed booms are separated into five to 13 sections. Each has two ends at which the spray stops and where air and contamination can accumulate (see point #3). Each section feed has a shutoff valve.  Once the spray mixture leaves the pump and bypass valve, it is committed to leaving the sprayer.  In a recirculating boom, the boom becomes a part of the tank and the liquid can return to the tank if desired. Spray is pressurized at one or both ends, and valve positions determine its flow. Sectional control is achieved with individual nozzle shutoff, air or electric.
      1. Three advantages:
        (a) the boom can be primed with new product without spraying. The surplus goes back to the tank.
        (b) the boom can be flushed with water without spraying while material is still in tank, and without spilling anything on the ground. Again, the surplus goes back to the tank.
        (c)  high resolution sectional control with individual nozzle shutoff is a byproduct of this design. Fast response, high res, saves money.
    2. Steel lines. Steel cleans easier than plastic, and this material makes a lot of sense for booms. But it also makes sense for the boom feeds, currently handled by black rubber hose.  This hose is a literal black box. We can’t see inside it, and we don’t know if and where potential contamination resides. It has considerable surface area. Consider replacing portions of your feed lines with steel. The boom is the obvious candidate. Aside from easier cleanout, it also helps with faster nozzle shutoff because it doesn’t expand with pressure.

    A word about dumping the tank on the ground. It’s a bad practice for many reasons. Let’s examine just one of those. When you spray a product at 10 gpa, you actually cover each square meter with about 10 mL, or 1/3 oz, of spray mix. When you flush your boom ends on the ground, you’re probably dropping 2 or 3 gallons in the same area. That’s 1000 times the label rate at each boom end, 10 to 26 times per boom. If you dump your tank remainder and all the hoses, say 20 or 30 gallons, that’s 10,000 times the label rate if it covers 1 sq meter. That’s leaching, runoff, residual potential, and not a good story.

    Many of the changes we outlined above help prevent that from being necessary.

    Pro Tip: To find out how much water your plumbing (from the pump to the boom ends) holds, do this: After cleaning with water and before spraying an EC formulation (white milky appearance in tank, some crop oils are ECs) reset your sprayed gallons on your rate controller. Start spraying and watch for the last nozzle on your furthest and longest section to spray white. Stop spraying and check your sprayed gallons. That’s your volume. No matter the size of nozzle or application volume, it stays constant. To be sure the boom is primed with a new mix, spray until those gallons are reached and you’re set.
  • Storing Pesticide Mix Overnight

    Storing Pesticide Mix Overnight

    Not being able to finish a tank due to weather or any other reason happens to just about everyone. Is it OK to simply leave the sprayer as is, and resume spraying later after some agitation?

    In many cases, the answer is yes. Most pesticide mixtures are stable in short term storage. On resuming spraying, an agitation could be all that’s needed to get back to where you started a day or so earlier.

    But there are three important exceptions.

    When the active ingredient is formulated as a suspension. Suspensions are typically wettable powders and flowables, and rely on a clay carrier to distribute the active in the tank. Because clay is denser than water, these formulations settle out quickly after agitation stops. Sure, they can be brought back into suspension with vigorous agitation. But in lines and booms, boom ends and screens, dislodging a settled clay carrier is much more difficult. It’s also hard to tell if the cleaning has been successful because the problem spots are hidden.

    The best solution is to flush the spray boom with water before materials can settle and lodge. A visual inspection where access is possible, such as strainer bowls and boom ends, is part of the process to ensure the formulated product has been removed.

    Learn to identify which formulations are suspensions. There’s lots of jargon out there. Look for terms such as DC, DF, DG, DS, F, Gr, SP. Even EC formulations are suspensions (oil in water) and require agitation.

    When the active ingredient is chemically unstable. Some pesticides can degrade in the tank, usually due to alkaline (high pH) hydrolysis. The effect is very pesticide specific, but in general, insecticides (particularly organophosphates and carbamates) are more susceptible than other pesticides. This fact sheet by Michigan State University describes the impact of pH on a the half-life of a large number of pesticides.

    Note that in the examples in the MSU fact sheets, pesticide half lives are typically days and weeks, and only rarely hours. Also note that while high pH is most often problematic, low pH can lead to faster breakdown in a small number of products.

    Ensuring tank mix stability requires a pH meter or paper, and possibly a pH modifier such as citric acid. But do your research first! Here’s an article on pH and water quality.

    When the tank previously contained a product known to harm the current crop. This situation is most common and most difficult to address. Some examples from western Canada are Group 2 modes of action sprayed prior to a canola crop. Why are Group 2 products implicated?  Many are formulated as dry products on a clay base, and these can settle in boom ends, adhere to tank walls, or get stuck on screens. Their solubility is pH dependent, as we explain in this article.

    Canola is particularly sensitive to this mode of action, and the most common canola herbicides, Liberty and glyphosate, are formulated with strong detergents that act as tank cleaners.

    Even when applicators think that their tank is clean, they can’t actually be sure and can’t do much about it at that stage. The stripping of tiny amounts of residue off the tank walls, filter screens, or plumbing, can happen during a mid-day stop or an overnight break.  Applicators eventually find out that this happened, usually about two weeks after spraying.

    Our advice is:

    After spraying a herbicide to which a subsequent crop may be sensitive, with the classic case being a Group 2 and moving to canola, be extra diligent with cleaning and pay attention to the tank walls, all screens, and boom ends.

    The best way to solve issues is to avoid them in the first place. If the weather looks unsettled and may interrupt your spray operation, consider mixing smaller batches that can be sprayed out completely even if conditions change quickly. This allows you to rinse the tank and spray water through the boom, thus avoiding a contamination problem developing overnight.

    If that’s not possible, at least do not let a tank mix sit in the boom overnight. Instead, use your clean water tank to push water through the boom prior to storage and double check the screens. The following day, prime the boom with your tank mix as usual and resume spraying the crop.

    If you’re not sure that your sprayer can draw from the clean water tank and push through the booms (the wash-down nozzles are, after all, the intended destination for that water), decipher your system and add the necessary valves that make this possible.

    A useful design that helps flush and prime a boom quickly is the recirculating boom offered by some aftermarket boom manufacturers. These booms are also more common on European sprayers. A nice feature of such designs is that the tank contents can be pumped through the entire boom assembly without actually spraying. This ensures that the boom is primed without any soil contamination. It also dilutes whatever residue there may be in the boom plumbing with the entire tank, likely reducing its concentration enough to be of little concern.

    An additional feature of recirculating booms is that many offer stainless steel tubing throughout most of their feed and return length, minimizing the black rubber hose products that often adsorb, and later release, herbicide contamination.

    Even if a wholesale boom or sprayer change is impractical, consider switching to steel boom lines and tanks tank to minimize residue carryover.

    As is often the case in the spraying business, prevention is easier and less costly than solving a big problem later. Spray mix storage is one of those examples where a small amount of extra effort at the beginning can pay big dividends later.

  • Should Backpack Sprayers be Used to Test Airblast Products? – Part 2

    Should Backpack Sprayers be Used to Test Airblast Products? – Part 2

    In Part One of this article, we showed that approximately 40% of minor use label expansions and registrant submissions rely on data from hand booms and guns. We also showed that a hydraulic backpack or knapsack will not give the same coverage as an airblast sprayer, and we concluded by suggesting that small plot researchers use spray equipment that reflects grower practices.

    Unfortunately, practical logistics prevent most researchers from using a full-size airblast sprayer. They may not have access to such a sprayer, and if they do, it takes considerable time to mix and clean between treatments. Further, treatments are often only a single row, or even a single plant. It takes too much pesticide, too much time, and too much plot space to justify using a full-sized airblast sprayer, even if the relevance of the results are questionable.

    Would another method of application better emulate an airblast application but retain the convenience of a hand boom or gun?

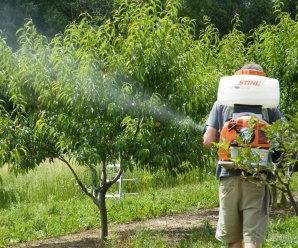
    The motorized backpack mistblower

    Using the same methods used to compare airblast to hand boom spray coverage in the previous article, we compared airblast sprayer coverage to that of a motorized backpack mistblower in grape, raspberry and peach (July, 2013). Once again, coverage was analyzed as overall percent coverage (see first graph) and droplet density (average droplets per square centimeter – see second graph).

    Comparison of average % coverage in peach, raspberry and grape using a mistblower and air blast sprayer emitting he same volume
    Comparison of droplets per square centimetre in peach, raspberry and grape using a mistblower and air blast sprayer emitting the same volume

    Results and Observations

    The mistblower met, or in the case of droplet density, exceeded the coverage obtained using an air blast sprayer in most crops. The results led to a few observations:

    • The significantly-higher droplet density is a function of the Finer spray quality produced by the mistblower (see water sensitive papers below). This may still represent a confound between small plot work and large scale airblast applications.
    • Drift between proximal treatments may be an issue given how far the mist was blown. This should be considered when planning plots.
    • While not shown here, spray coverage was more consistent throughout each canopy, of each crop, when using the mistblower. This is likely because the operator was able to aim the output as they swept the spray over the canopy, thereby ensuring all surfaces were hit from multiple angles.
    • While we always try to be brand-neutral, it should be noted that we’ve used multiple Solo mistblowers over the years, and all of them required significant maintenance (no matter how they were cleaned and stored). It was very difficult to find brand parts and repair expertise in Ontario. The Stihl brand currently has far more dealers, and more accessible parts, and has not caused us any difficulties (yet).
    • Always use the highest grade gasoline in two-stroke engines to avoid ethanol gumming up the carburetors!
    • Always calibrate mistblowers by volume because raising and lowering the boom will affect the flow rate.

    Conclusion

    Hand booms, and likely hand guns, are not appropriate for testing agrichemical products intended for use with an airblast sprayer. Data derived from these methods should be questioned. An airblast sprayer is the best choice for any such research, but a mistblower is a viable alternative. Transparent, standardized operating protocols for testing products intended for use in airblast sprayers should be required.

    Try this calculator to determine what droplet sizes are produced by a backpack mistblower. It will help dial-in your operational settings.

    Thanks to Vaughan Agricultural Research Services Ltd. for their assistance in the research performed for this article, and to Mark Ledebuhr for sharing the data used to develop spray quality app.

  • Should Backpack Sprayers be Used to Test Airblast Products? – Part 1

    Should Backpack Sprayers be Used to Test Airblast Products? – Part 1

    Peer-reviewed journal publications claim there is a significant difference in spray coverage and deposition patterns when an agrichemical product is applied using an airblast sprayer versus a hydraulic hand boom. An airblast sprayer creates Fine droplets that shear in entraining air and are carried into a plant canopy. Properly calibrated, the air opens the canopy to expose all target surfaces to the spray. By comparison, a hand boom relies on pressure to propel fine droplets into a canopy, and while there is some air-entrainment surrounding the spray, it cannot travel as far or displace as much canopy. As a result, most of it impacts on the outer surfaces of the canopy.

    Knowing this, it is surprising that so many products intended for use with airblast sprayers are applied by researchers and consultants using hand booms or the high-pressure arborist-style handgun (see ‘Survey of Submissions’).

    Survey of Submissions
    This graph represents a random selection of 150 minor use label expansion studies and registrant submissions from Canada and the USA spanning 1990 to 2011. It shows the application method by crop.

    In 2012, we performed some research with the following goals:

    • To demonstrate the difference between spray deposition and coverage when using a hand boom versus an airblast sprayer.
    • To create a sound basis for questioning and potentially improving how agrichemical products for orchard, bush, and vine are tested in Canada.

    Using water-sensitive paper to diagnose spray coverage, airblast sprayer application was compared to hand boom application in highbush blueberry, apple and grape.

    Target locations in highbush blueberry.
    Target locations in apple.
    Target locations in grape panel.

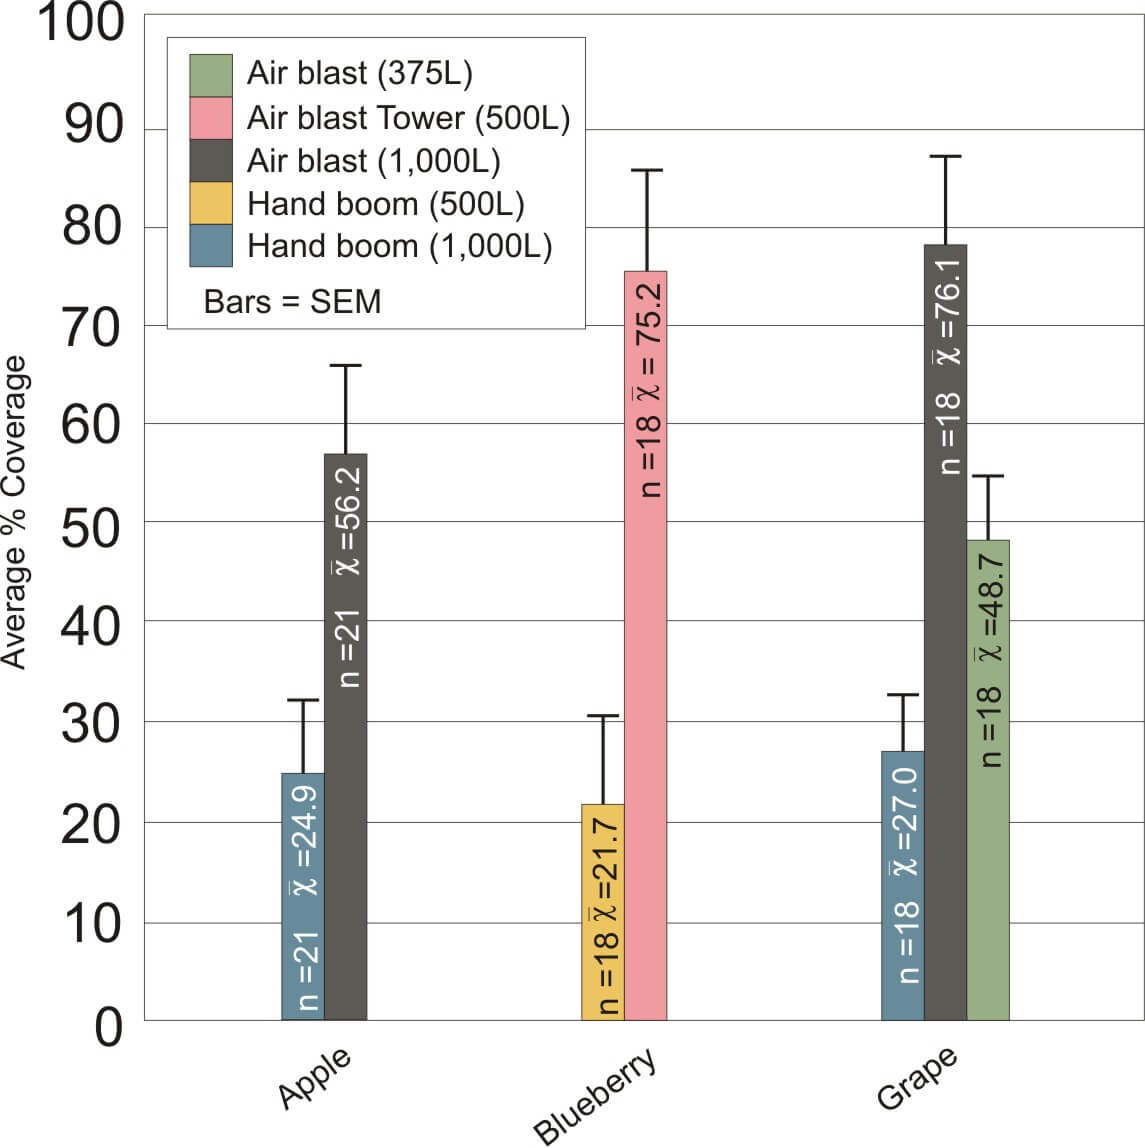
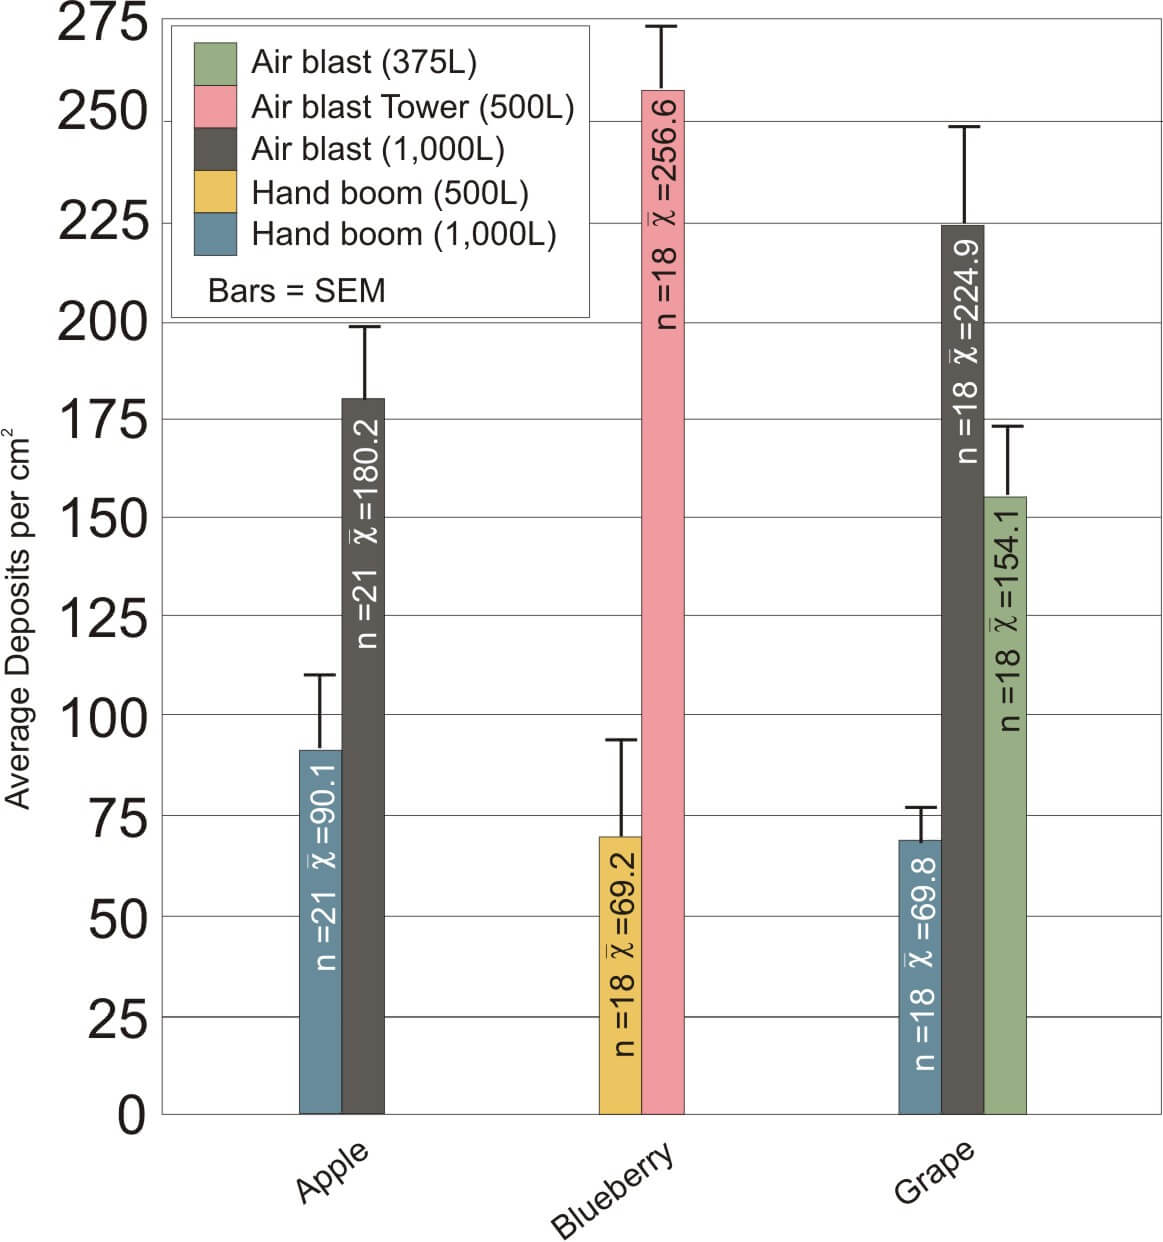
    Sprayers were calibrated to emit the same volume per planted area via hollow-cone nozzles. Volumes selected were based on typical application volumes for Pristine or Captan (commonly sprayed in Canada). While there is no standardized protocol (and there should be) we followed typical practices of 500L/ha for grapes, blueberry and apples until plant growth warrants higher carrier volumes. At that point, many researchers go up to 1,000 L/ha. Coverage was quantified by collecting and digitally scanning water-sensitive papers to calculate overall percent coverage (see graph) and droplet density (average droplets per square centimeter – see graph).

    Overall percent coverage
    Droplet density

    Conclusion

    In all cases, airblast applications deposit > %50 more spray than a hand boom. In the case of grape, you’ll note there are three bars. This is because spraying 1,000 L/ha with the airblast sprayer drenched the targets (it was late in the season and the canopy was sparse), making it impossible to discern droplet density. When we reduced the output to  375 L/ha, we were able to register droplet density, which was still significantly higher than that produced by the hand boom at 1,000 L/ha. This raises significant questions about the validity of efficacy and residue studies performed with hand booms when growers apply the same products using airblast sprayers.

    When this data was shared at extension conferences, it was sometimes noted that many researchers choose to spray the target until it is drenched, ensuring the dose administered to the crop reflects what was intended. This does not, however, invalidate the fact that a growers spray equipment and practices are significantly different, and the dose and spray distribution they achieve will not reflect the original research.

    The recommendation is that researchers use the same equipment to test products as the growers use to apply them. But, recognizing the difficulties associated with performing small plot experiments with full-sized airblast sprayers, an alternative is needed. That topic will be addressed in part two of this article.

    Horticultural Crops Ontario, the grower co-operators and former OMAFRA summer student Carly Decker are gratefully acknowledged for making this research possible.

  • Spray Drift – Why is it still happening?

    Spray Drift – Why is it still happening?

    Despite the abundance of information available on spray drift, we continue to see widespread incidents of damage to a variety of crops every year. Do applicators just not care or are they missing some vital information when making decisions to spray? I believe it is the latter.

    What is the problem?

    In my experience, the vast majority of spray drift cases (probably 90% or more) are the result of ‘inversion drift’. That means the drift has not come from an adjacent sprayed area, it has come from one or more sources that are some distance from the site of damage. The distance between the sprayed site and the location of the damage may vary dramatically, from a few kilometres to tens of kilometres.

    Why is there so much inversion drift when labels specifically prohibit use of the products under surface temperature inversions? Many may argue that it is a blatant disregard of the label by a few applicators (translation = cowboy operators). I do not agree this is the main problem. While I can confirm the existence of ‘cowboy operators’, thankfully they are limited in number. I believe the problem is a lack of understanding about how to tell when there is an inversion and particularly not knowing how ‘day wind’ moves differently to ‘inversion wind’. I continue to see good farmers/applicators doing what they believe to be the right thing but it is not. These are people very concerned about minimizing spray drift; they honestly do not think they are doing anything wrong.

    What is ‘day wind’?

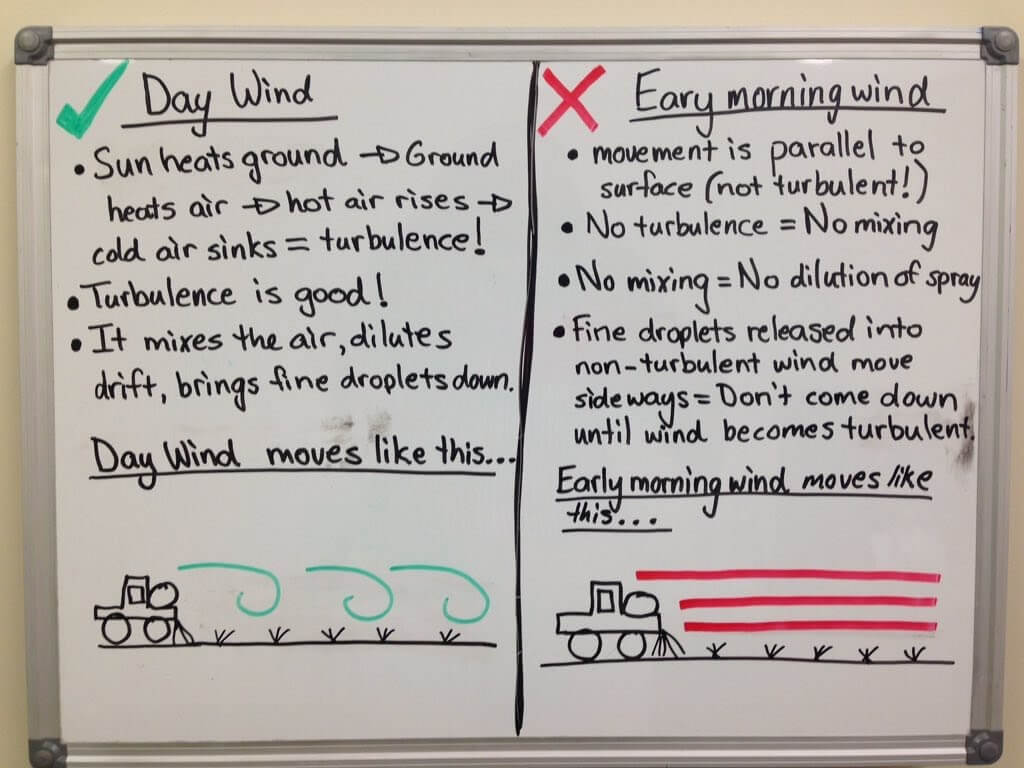
    After sunrise, the sun begins to heat the ground, the warm ground then heats the air close to the surface, and this air then rises. As that warm air rises, cold air from above sinks down to replace it. The ground then warms this cold air and it rises. This cycling of warm air rising and cold air sinking creates turbulence and then wind. This is a good thing; turbulent wind movement is much safer for spraying. ‘Day wind’ has a turbulent motion and is much more likely to pull any fine droplets to the ground within a reasonable distance. During the day, we can predict which direction and how far our fine droplets will travel.

    What is ‘inversion wind’?

    As the sun sets, the ground begins to cool quickly and this in turn cools the air next to the ground. As we all know, cold air does not rise and warm air does not sink. This means there is a layer of cold air trapped close to the surface and a layer of warm air above it. The result is no turbulent movement or mixing of the air. The air may become quite still and this is often observed around sunset when the daytime wind ceases or drops off. What happens next is where the real danger occurs for spraying.

    As the night progresses and the ground cools more, the cool air close to the surface becomes colder and therefore more dense, particularly from midnight onwards. This cold dense air then begins to move across the landscape, often down slope and in very unpredictable directions. Remember this air is not turbulent, there is no mixing, it has layers of air, something like layers in plywood, and it flows parallel to the ground. Any fine droplets released into these layers of cold non-turbulent air will simply move sideways across the surface until the sun rises and heats the ground again. This is when the fine droplets are released from the layers and they come to ground, often in the lower parts of the catchment and a long way from the site of application. It is impossible to predict what direction this ‘inversion wind’ will go. For this reason, spraying in this type of wind is extremely high risk for spray drift.

    Key indicators that and inversion is unlikely

    • We should always expect that a surface temperature inversion has formed at sunset and will persist until sometime after sunrise unless we have one or more of the following: continuous overcast weather, with low and heavy cloud;
    • continuous rain;
    • wind speed remains consistently above 11km/h for the whole time between sunset and sunrise;
    • and after a clear night, cumulus clouds begin to form.

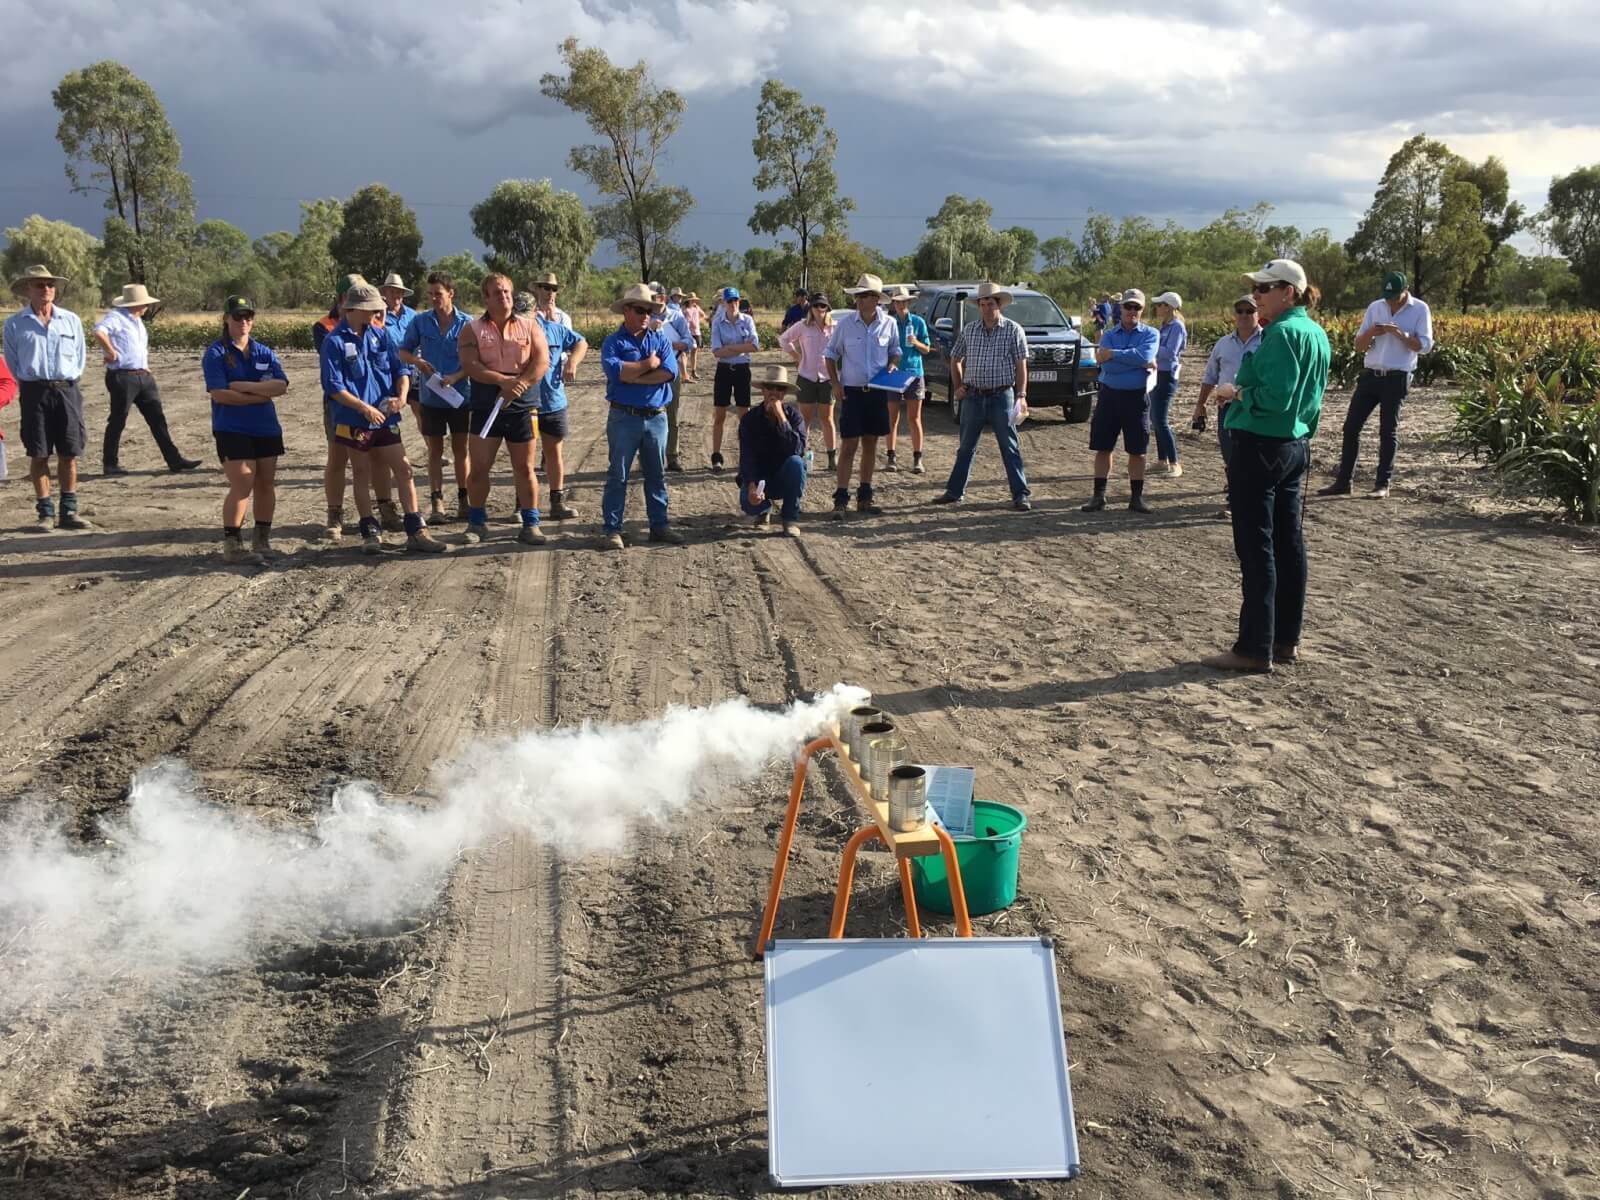
     Inversion wind movement – practical demonstration video

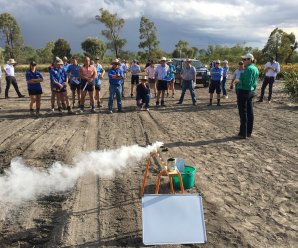
    Wind is a key factor in any spray application. The problem is that not all wind is the same. To reduce the incidence of spray drift, it is critical that spray applicators understand how wind moves, particularly during a surface temperature inversion. This video uses smoke flares to visually demonstrate the air movement under inversion conditions.

    Here’s what we’re looking for: moderate wind with consistent direction that disperses spray and drives it to ground.

    Conclusion

    Many factors affect the potential for spray to drift but the main ones are; the weather conditions at the time of application, nozzle selection, products/tank mix used, actual spray quality achieved, speed of rig, and boom height. The common denominator is that all of these things are within the control of the spray operator.

    Spraying under inversion conditions is extremely high risk and prohibited on many product labels, that means it is illegal. If you are serious about preventing drift, then you must learn how to identify when an inversion is likely to be present and more importantly when it has broken.

    All agricultural chemicals have the potential to drift; it is how we use them that increases or decreases that potential. Therefore, the problem is a human one, not a chemical one. There is a suite of information available but if you are still unsure or need any assistance, please seek advice from an expert. Maintaining long-term access to key products depends on us reducing spray drift.