Tag: airblast

  • Testing and Correcting Airblast Pressure

    Testing and Correcting Airblast Pressure

    The role of pressure is often underappreciated in spraying. Many airblast operators (still) don’t use rate controllers, so the only way to monitor sprayer pressure is using a single liquid-filled pressure gauge located near the pump… and it may not be trustworthy. An inaccurate pressure gauge may cause you to spray more or less product than you intended. That translates to wasted resources and potentially higher residue levels. Conversely, spraying less than intended may lead to reduced efficacy and the need to re-apply. Many operators use budget pressure gauges on their sprayers and have never tested or replaced them.

    Testing pressure gauges

    Here are a few clear indications that your pressure gauge should be retired:

    • Gauge has an opaque or unreadable face
    • Mineral oil leaking or mostly gone
    • Needle does not rest on zero pin when sprayer is not under pressure (it has likely spiked)

    Sometimes a gauge is not obviously in need of replacement. To test it, you need to apply a known pressure to see if it is reading accurately. One way to do this is using a commercial manometer.
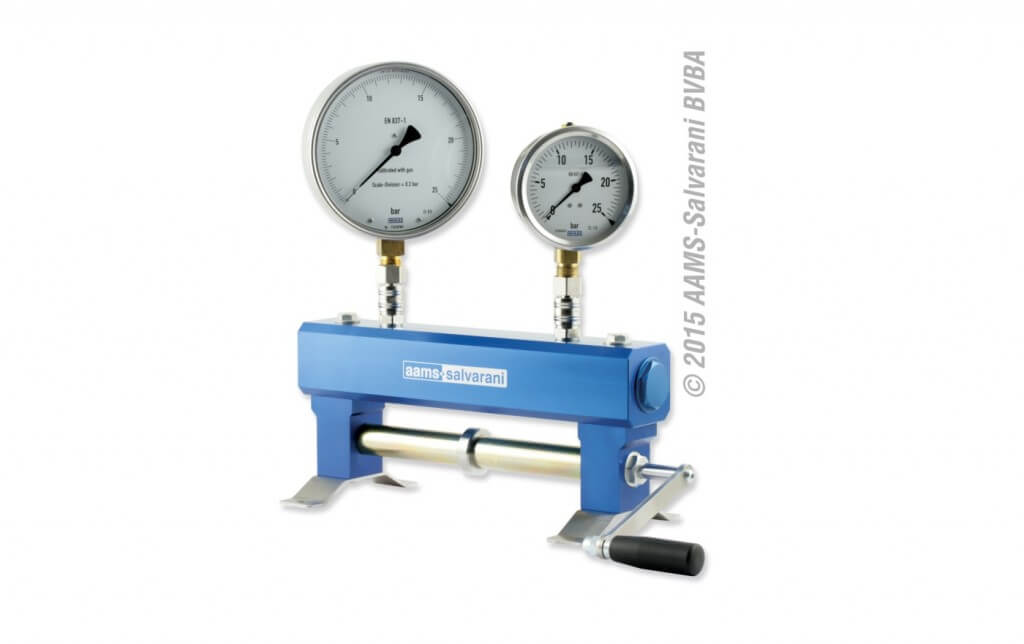
    AAMS-SALVARANI Gauge tester
    AAMS-SALVARANI manometer

    These systems work well, but they can be an expensive proposition if you only use them once in a while. In a past sprayer workshop, one participant had a great suggestion for testing gauges. His idea was to use an air compressor (which most farms have) and some simple plumbing to create a homemade manometer. Be sure to vent the gauges before testing.
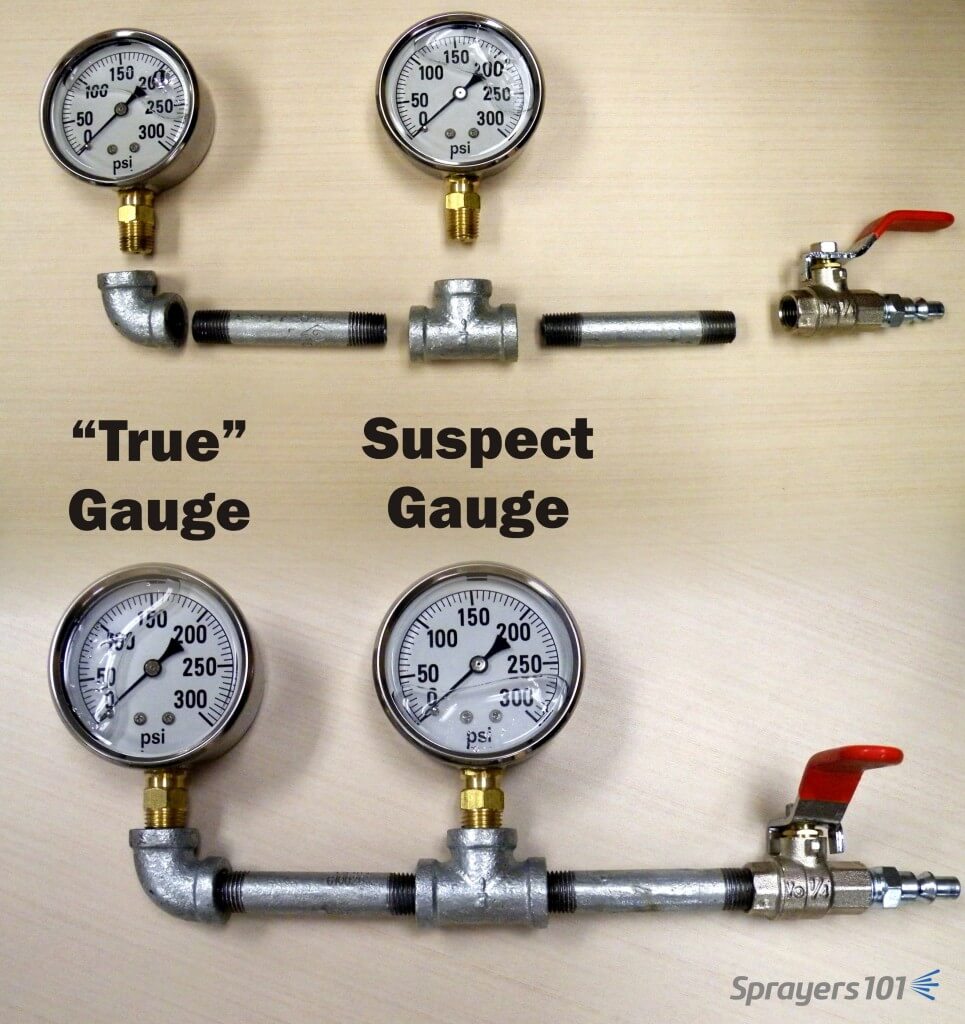
    The Pressure Gauge Tester. The “true” gauge is in the elbow and can be compared to the suspect gauge in the tee. Concept from K. Voege, Ontario.
    The “Pressure Gauge Tester”. The accurate gauge is in the elbow and is compared to the suspect gauge in the tee. Concept: K. Voege, Ontario.

    This tool allows you to test your suspect gauge (set in the tee) against an accurate gauge (set in the elbow) for less than $75.00 CAD. Construct your own “Pressure Gauge Tester” using the following parts (valve optional):

    PartApprox. Price (CAD)
    ¼” by 3” Galvanized nipples (x 2)$3.50
    ¼” Galvanized 90º elbow$3.50
    ¼” Galvanized Tee$3.50
    ¼” Ball valve (threaded)$10.00
    *Plug Air Connector (A over ¼”)$4.00
    Teflon pipe tape$3.00
    †300 psi liquid-filled gauge$40.00
    *Depending on the quick-connect fitting on your compressor 
    †The range of the accurate gauge should match your existing gauge. The range of your existing gauge should be twice as much as your typical operating pressure. 

    As a public service announcement, be aware that many budget, liquid-filled gauges are inaccurate right off the shelf. A 5% variance is typical. When replacing a worn gauge, or buying the “accurate” test gauge for your homemade manometer, buy a few and save the receipt. Test them in different combinations to ensure they all agree with one another. Return the extras and let the dealer know if you discover an inaccurate gauge. I’m sure they won’t put it back on the shelf for the next person… *ahem*.

    Gauges should be rated twice as high as your average operating pressure. For example, if you typically spray at 150 psi, your should have a gauge rated up to 300 psi. That way, you can see small changes in pressure more clearly. Plus, if your needle is pointing straight up, a quick glance confirms the ideal operating pressure.

    Another way to confirm pressure gauge accuracy is to install a second in-line. They’ll keep one another honest. This may be difficult if the gauge set into a molded plastic tank, or located under the chassis next to the pump where it is not visible from the tractor.
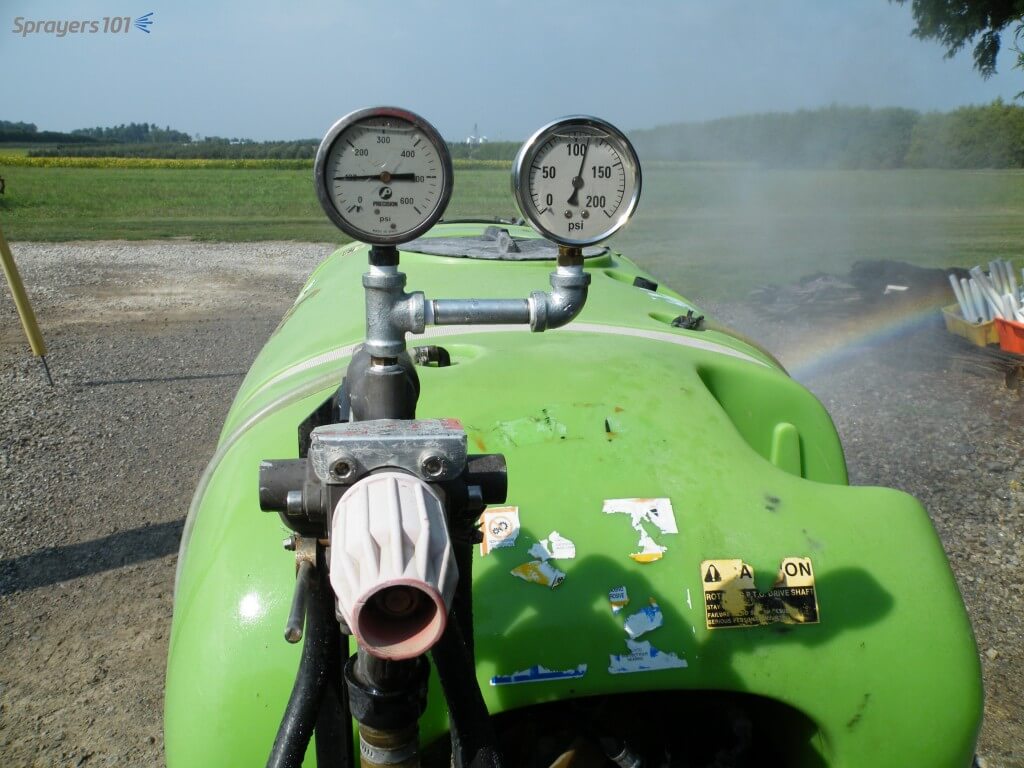
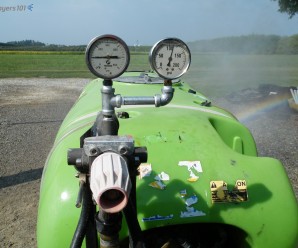
    Two gauges keep each other honest – this GB (Italian-made Good Boy) is sporting a home-made assembly that cost ~$50 to assemble, including the second gauge. The silver spray paint on the black pipe prevents rust and makes it look pretty darn sharp.
    Two gauges keep each other honest – this GB (Italian-made Good Boy) is sporting a home-made assembly that cost ~$75 CAD to assemble. The silver spray paint on the black pipe prevents rust and makes it look pretty darn sharp. Note that they should be the same range, but are not in this photo. The one on the right is the correct range for this operating pressure.

    Measuring and Correcting for Pressure Drop

    Boom pressure can sometimes be less than the desired operating pressure (a phenomenon known as “pressure drop”) and must be accounted for. Pressure drop is affected by hose diameter, hose fittings, and the distance from the pump. You’ll find it at the far ends of boom sections on field sprayers and it’s an issue that plagues many low-pressure, tower-style sprayers. Dress appropriately because you’re going to get wet performing this diagnostic.

    1. Fill a clean sprayer about half-full with water.
    2. Install a liquid-filled test gauge in the highest nozzle position of one of the booms. The image below shows how the nozzle cap or entire nozzle body may need to be removed for this step. For Metric fittings, contact your sprayer dealer – they can be hard to find.
    3. With the tractor parked, bring up the rpms and get the lines to the desired operating pressure.
    4. Open the boom(s) and measure the pressure at the nozzle farthest from the pump. All nozzles on all booms should be open during this test. That’s why you are wearing PPE.
    5. For positive displacement pumps, adjust the main pressure regulator until the test gauge reads the desired pressure. For centrifugal pumps, it is possible to make small changes to the pressure, but more important to note any pressure differential for later considerations regarding nozzle output and spray quality.
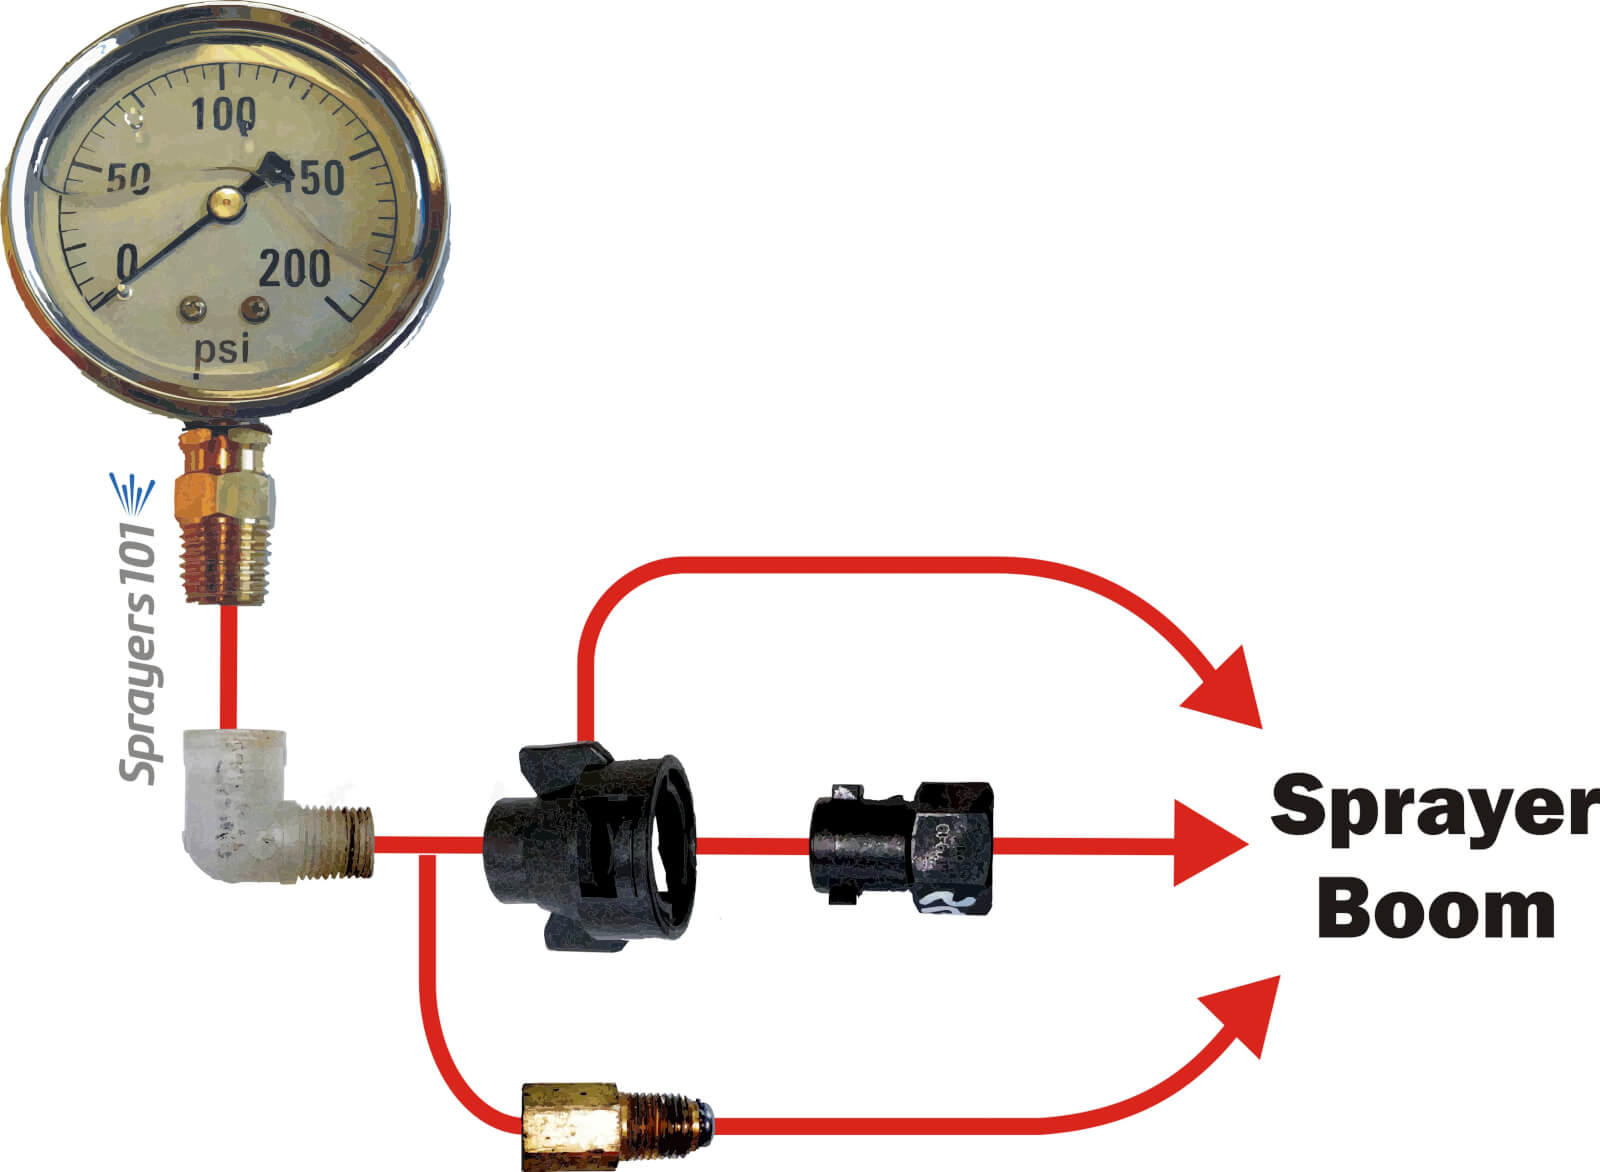
    There are many ways to install a gauge onto a nozzle body. Here are three examples of common fittings.
    There are many ways to install a gauge onto a nozzle body. Here are three examples of common fittings.

    Switching between multi and single boom operation

    When sprayers that employ a positive-displacement pump are switched to one-sided operation (E.g., border spraying or during turns), the pressure can change considerably. Most units will experience a pressure increase, thereby increasing the boom output. This is typically an indication of a faulty relief valve, which is positioned between the pump and nozzles. It’s actuated by a spring-loaded piston or diaphragm, opening and closing in response to changes in pressure. The operator sets the desired pressure and any additional pressure forces the valve open, diverting excess flow back to the tank via a bypass.
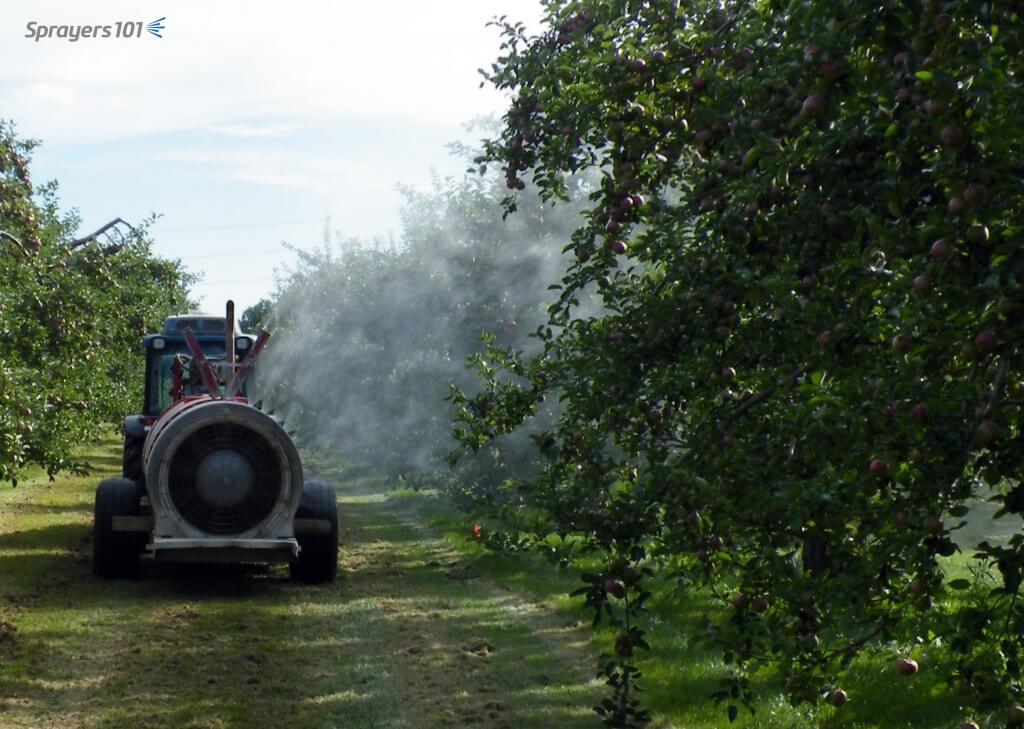
    Spraying from one boom. This operator checked to make sure the pressure didn’t increase when he closed the second boom. High pressures or sudden spikes could indicate a faulty regulator valve.
    Spraying from one boom. This operator checked to make sure the pressure didn’t increase when he closed the second boom. High pressures or sudden spikes could indicate a faulty relief valve.

    This problem can be greatly reduced by properly sizing the regulator (specifically the spring) to the typical operating pressure. Many sprayers come equipped with regulator springs matched to the maximum pressure range of the pump (often 600 – 900 psi). These springs are unable to respond to changes when operating at lower pressures (E.g., 100-200 psi, which is typical of applications to moderately-sized canopies).

    The springs are so stiff that the liquid pressure is unable to act on the spring and the valve essentially acts as a flow control (throttling) valve rather than a pressure control valve. Liquid pressure is difficult to control using a throttling valve; it is unable to compensate if the tractor engine speed drops while driving uphill and sprayer output is subsequently reduced. Further, this phenomenon can cause pressure gauges to spike.
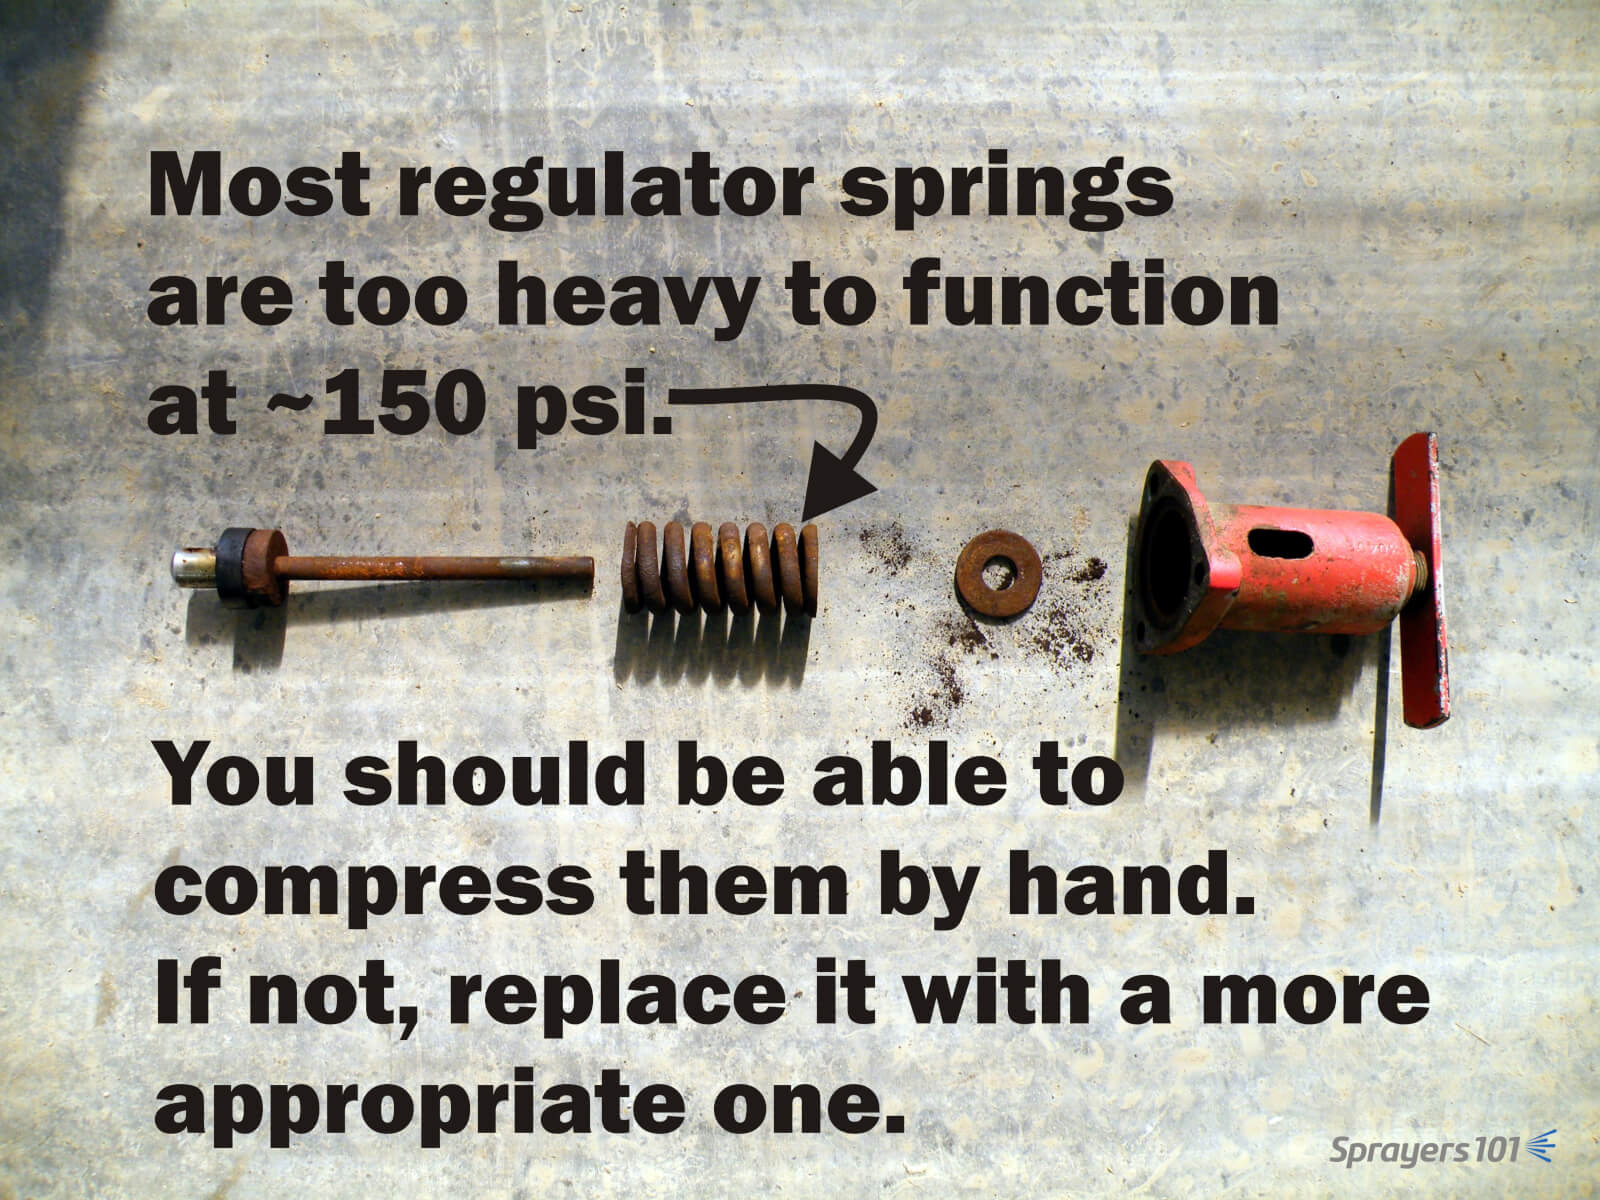
    Valve springs and seats wear out, such as in this regulator assembly. Check yours each season.
    Valve springs and seats wear out, such as in this regulator assembly. Check yours each season. If you spray using moderate pressures, be sure your regulator spring can compensate for small changes.

    Some sprayer designs attempt to compensate for excess flow during single-boom operation. They employ an additional throttling valve to shunt the volume that would normally would be spraying out through the closed boom. The result is that the pressure should remain constant when a single boom is shut off. If your sprayer has this feature, here’s how you set the valve:

    1. With PTO at application speed and both booms open, adjust regulator to calibrated operating pressure.
    2. Close one boom.
    3. If pressure increases, open throttling valve to achieve calibrated operating pressure. If pressure decreases, close throttling valve to achieve calibrated operating pressure.
    4. Repeat process for the other boom, and find a compromise position for the valve.

    Some operators elect to remove the handle from the throttling valve once it is set so they don’t accidentally bump it later. That’s fine, but further adjustments may be required when transitioning between dilute and concentrated volumes, so don’t lose the handle.

    Here’s an oldie-but-a-goodie filmed in New Hampshire in June, 2014. It’s something to keep in mind when you’re getting your sprayer ready for spring service. Thanks to Chazzbo Media and Penn State Extension for making an unscripted and spur-of-the-moment concept into a polished video.
  • Optimizing Sprayer Air Settings – Part 2

    Optimizing Sprayer Air Settings – Part 2

    This is part two of a two part article on how to optimize the match between the sprayer air and the target canopy. You can find the first part here. For a more fulsome description of the process, consult chapters 3, 9, 10, and 11 of Airblast101.

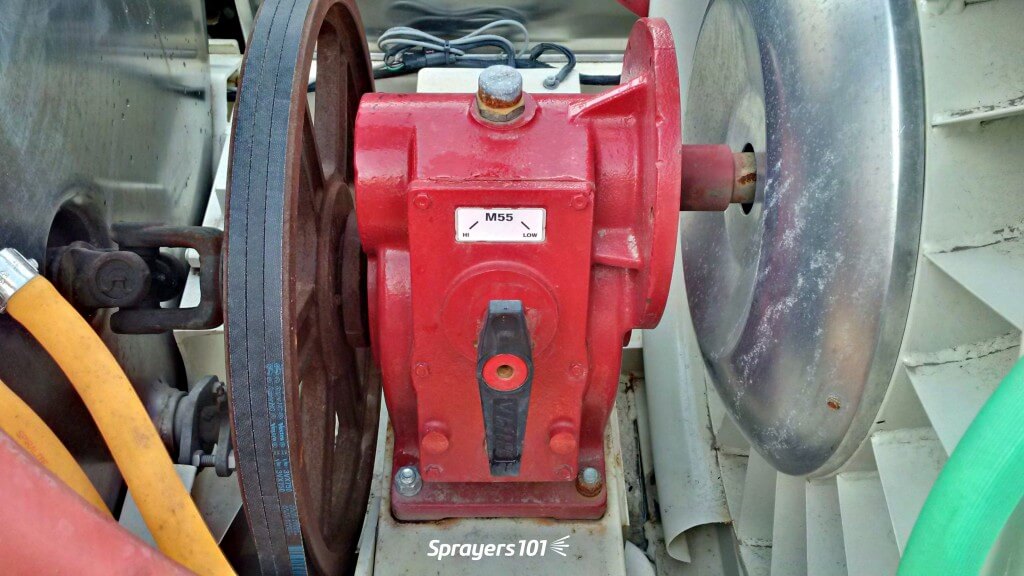
    A close up of an airblast gear box. There are usually two options – high or low.
    A close up of an airblast gear box. There are usually two options – high or low.

    Evaluating air energy – Ribbon test part 2

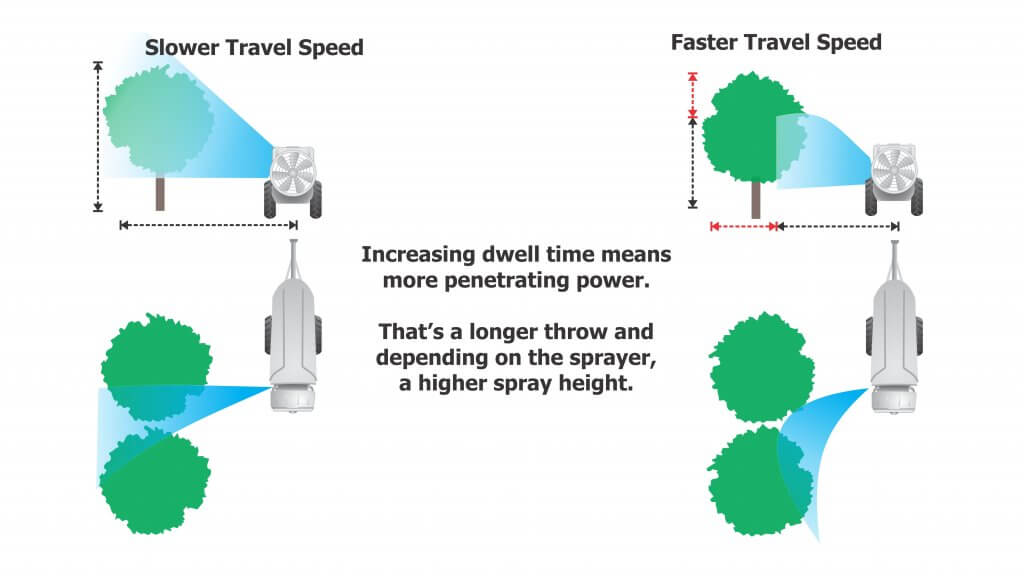
    Air behaviour can change radically between stationary operation and driving. We learned in part one of this article that slower travel speeds increase the throw and the spray height. The simplest way to monitor where air is going is for a partner to watch the leaves in the target canopy. Leaves that are ruffling indicate that air is reaching them.

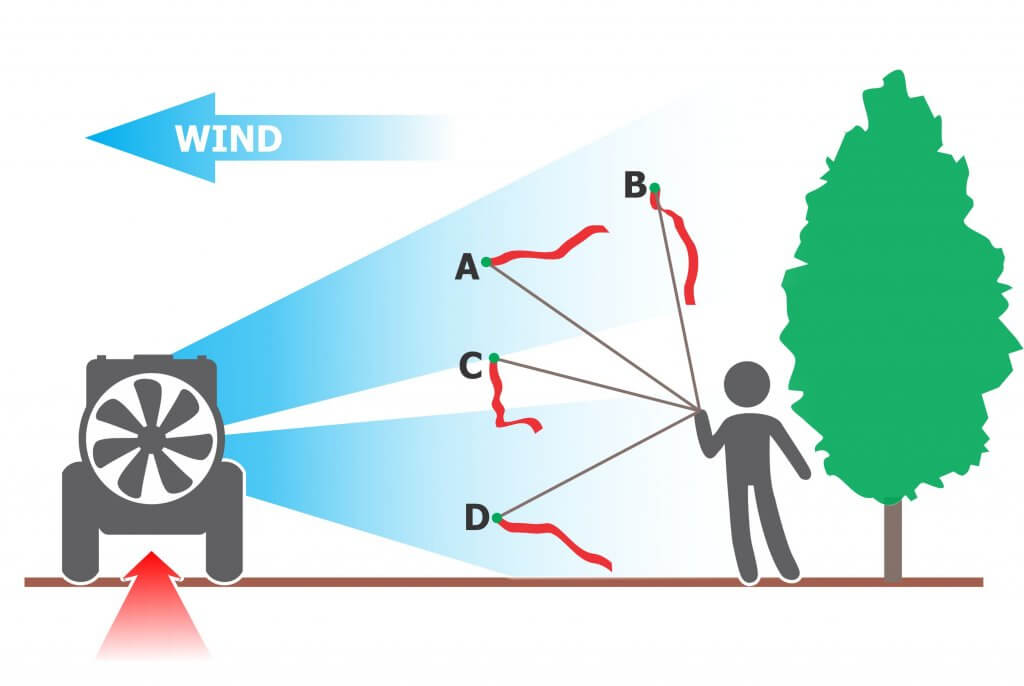
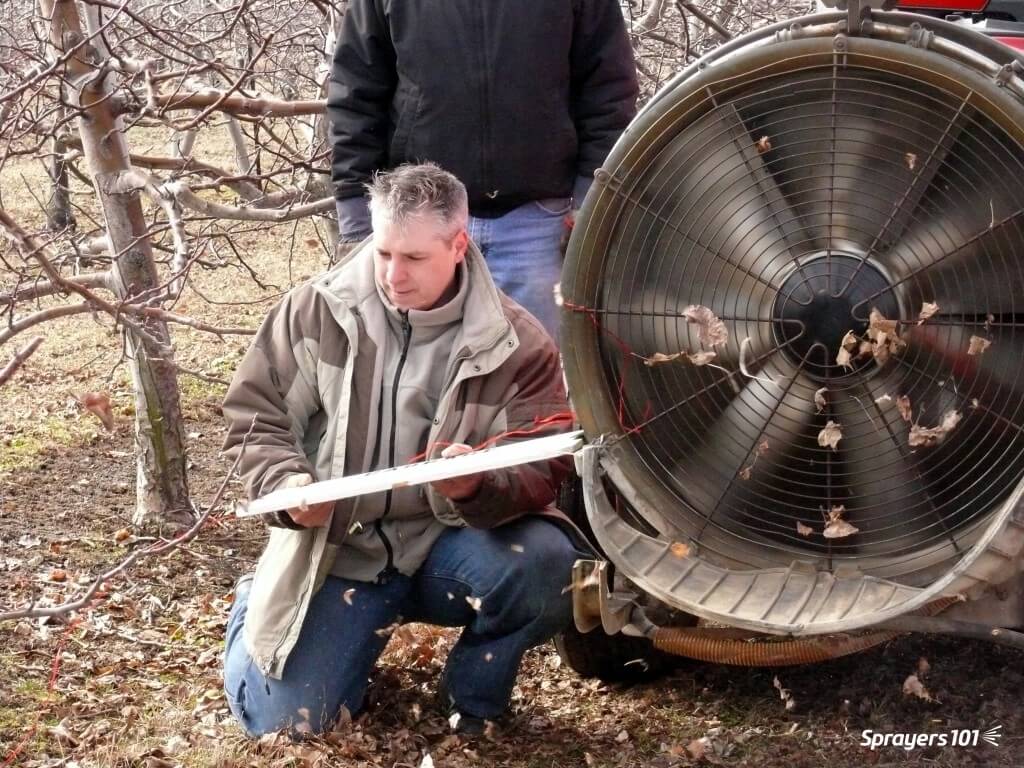
    A more informative method, and one that works during dormancy, requires a length of flagging tape tied to the end of a long stick. The partner (wearing eye and ear protection) can move the ribbon around in the air wash, extending it into areas of interest. The ribbon’s behaviour will indicate gaps, the air angle and relative air energy. The ribbon can be interpreted using the following figure.

    Work with the sprayer oriented to blow into any crosswind. Extend the ribbon into the sprayer air while the sprayer is stationary, or preferably, while driving. The ribbon’s behaviour will show what you couldn’t otherwise see. Here are a few possible outcomes: A. The angle and air energy are appropriate while the sprayer is stationary. B. The air energy is not sufficient to reach the tree top when the sprayer is driving. C. Obstructions or deflector misalignment can create gaps. D. Air is angled too low for the target canopy.

    Evaluating canopy penetration – Ribbon test part 3

    This final diagnostic accounts for the influence of any intervening canopy (or canopies for multiple-row strategies). It confirms that the air energy has the potential to carry droplets the full extent of the swath. Evaluating one side will give you a lot of insight but if you have the time it’s better to do both sides. Since most sprayers have at least some imbalance in air handling, the results may surprise you.

    1. Choose a canopy that is upwind and on the lift side of the sprayer (if applicable).
    2. Move the sprayer a distance into the row to allow it to reach target speed and to avoid wind effects on the periphery.
    3. Attach 25 cm (10 in.) lengths of flagging tape on the far side of the target canopy. Do this at the top, middle and bottom of the canopy. In tall canopies this might require a ladder, telescoping pole, or sections of galvanized pipe to raise the ribbons.
    4. With deflectors/spray outlets adjusted and the desired fan gear (or fan speed) selected, start the air without spraying and bring the sprayer up to the target travel speed. A partner wearing eye and ear protection will stand in the next alley and observe the ribbons as the sprayer passes (preferably recording a video for the operator).
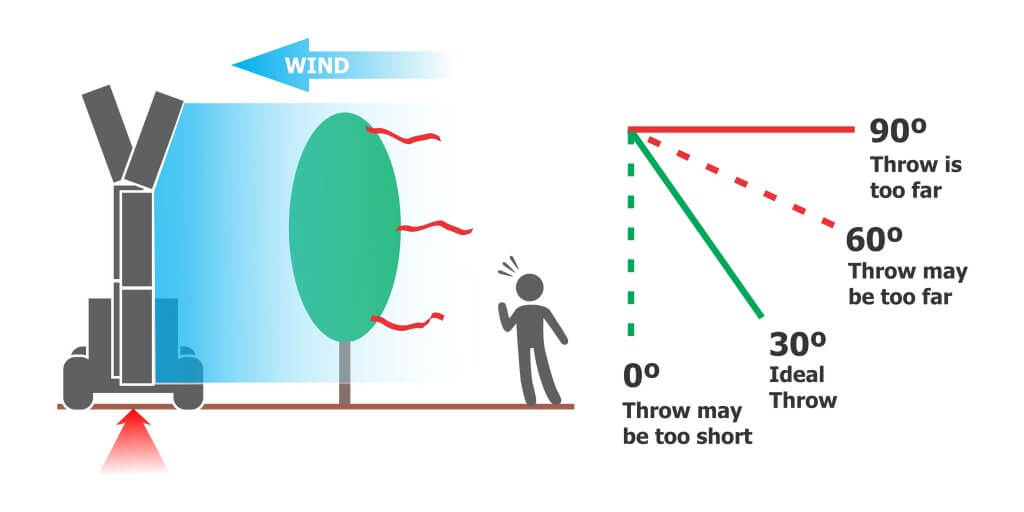
    Three ribbons are positioned on the far side of the upwind target canopy. In this case, an every-row traffic pattern is depicted. The observer watches or records the ribbons as the sprayer drives past with the air on (not the spray). For an every-row traffic pattern, the air energy is too high if the ribbon strains at 90⁰. It is ideal for the ribbon to briefly flutter (0⁰-60⁰). If the ribbon does not move (0⁰), the air energy may still be sufficient as long as it penetrates to the centre of the canopy. This is often the case with particularly dense/wide trees like nuts and citrus.
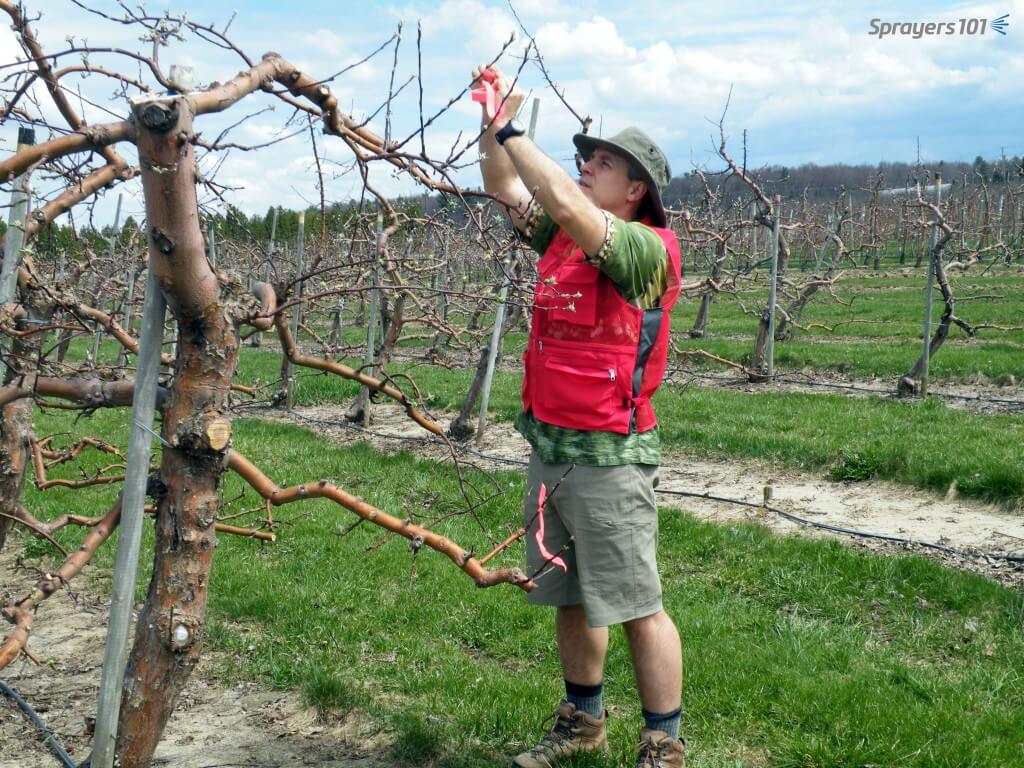
    Tying flagging tape in trees to indicate prevailing wind and to calibrate airblast air settings.
    Tying ribbons on the up-wind side in an apple orchard just past green-tip. The red vest has lots of pockets to hold supplies and sprayer operators can see it clearly for safety. The Hawaiian shirt is because it was a Friday.

    Repeat this process this for EACH significantly different crop sprayed with the sprayer. As with air direction settings, multiple set-ups might be needed to reflect each block, or you might choose to group of similarly-sized blocks and calibrate air to the worst case scenario. Record the set-up for each sprayer/block combination and keep a copy in the tractor cab(s).

    Interpreting the ribbon tests

    Interpreting the ribbons is not always straightforward. When they don’t behave as anticipated they may be indicating one or more of the following problems:

    1. The air angle is incorrect.
    2. The air energy is too low.
    3. The air energy is too high.

    There might be a single cause or several contributing factors. As you diagnose and attempt to correct these problems be aware that addressing one may create others. If the problem cannot be corrected, the sprayer configuration (or design) may be inappropriate for the canopy or the environmental conditions.

    Ribbons that don’t point from the sprayer to the canopy may indicate a misalignment of spray outlets or deflectors. The bottom of the air should align with the bottom of the target. More critically, the top of the air should slightly overshoot the top of the target. We want to avoid spray drift, but we must account for wind speed increasing with height and vertical booms that rock on uneven alleys. If the spray does not slightly overshoot the top of the target, it may miss it entirely.

    Adjusting horizontal alignment, when possible, can significantly impact sprayer performance. It can be tricky to optimize the angle because it represents the sum of several complicated interactions. Air outlets on wrap-around sprayers may be positioned too close to the target canopy to permit a ribbon test. However, you can still use the ribbon-on-a-stick technique to visualize how the air is behaving. Consider the following when positioning air outlets on either side of a canopy:

    Unresponsive ribbons are often observed during a ribbon test. Depending on where the ribbon is located, this may or may not indicate a problem. Ideally, the top ribbon should always move in response to sprayer air. In larger canopies, this location represents the greatest distance sprayer air must travel and the highest wind speed it will encounter. The middle and bottom ribbons may or may not move in response to sprayer air. This is common in larger, denser canopies. To confirm this, an observer would have to stand at the trunk and watch the leaves rather than the ribbons.

    Shingling and canopy distortion

    When possible, do not position laminar air outlets in direct opposition. The convergence creates a high pressure zone that reduces spray penetration. Laminar flows will deflect unpredictably around this pressurized area and carry droplets back out of the canopy. Unless the canopy is narrow and sparse, turbulent air handling systems do not typically create this problem. In both cases, canopy penetration is improved when fans are staggered and/or are angled slightly forward or backward.

    When too much air is vectored directly at the canopy face, it may close and compress that canopy rather than penetrate it. This is more likely when air is high energy, has a narrow air wash or is more laminar in nature. When leaves shingle, the overlap blocks spray and creates resistance to sprayer air. Air will then take the path of least resistance and either deflect around the canopy or channel through any openings. Shingling can be corrected by angling air outlets slightly forward or backward. A little goes a long way as small changes can have big effects.

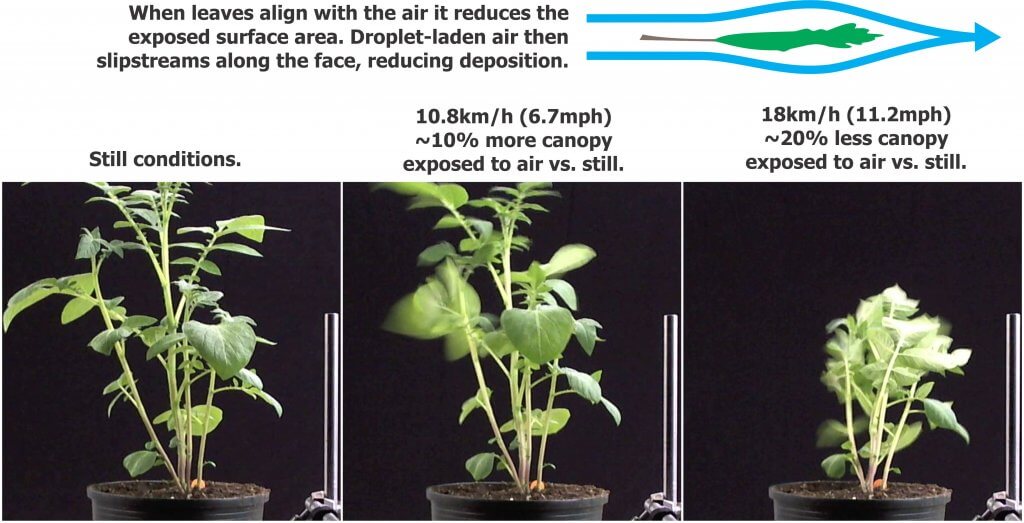
    Dr. Bernard Panneton (formally with the Horticultural R&D Centre, Agriculture and Agri-Food Canada) performed a series of experiments exploring the relationship between potato canopies and wind and his observations extend to all broad leaf crops. Bernard showed that as wind speed increased, the percent of leaf surface area exposed to spray also increased, but only to a point. If the wind got too fast, the percent of leaf surface exposed to spray dropped significantly: ~20% less!

    His interpretation was that low to moderate air speeds just ruffled the leaves, exposing their broad surfaces to spray more consistently. When air speed became excessive, leaves and twigs aligned with the wind, exposing only their thin edge to spray. The take home lesson is that spray will be more likely to impinge on all target surfaces when air speed and volume are calibrated correctly.

    Bernard summed this article up succinctly: “More air is not better!”

    Potato canopy distortion in an air tunnel. Research by Dr. B. Panneton.

    Video summary

    We’ll finish the article with a light-hearted video describing how the process works. It doesn’t explore the second ribbon test, but that’s more of a concern with distant targets or alternate row spraying strategies where the sprayer must penetrate one or more canopies in a single pass.

  • Optimizing Sprayer Air Settings – Part 1

    Optimizing Sprayer Air Settings – Part 1

    This is part one of a two part article on how to optimize the match between the sprayer air and the target canopy. For a more fulsome description of the process, consult chapters 3, 9, 10, and 11 of Airblast101.

    Why is air so important?

    Air handling is the most important and least understood mechanical system on a sprayer. Most air-assisted sprayers for three-dimensional perennial crops produce droplets that are Medium or smaller according to the ASABE S572.3 droplet size classification standard. These small droplets have very little mass relative to their surface area, so they don’t have much kinetic energy. Without air to impart speed and direction, most droplets would never go where we want them to. In addition, air opens and moves a canopy, exposing otherwise hidden surfaces to the droplets it’s carrying.

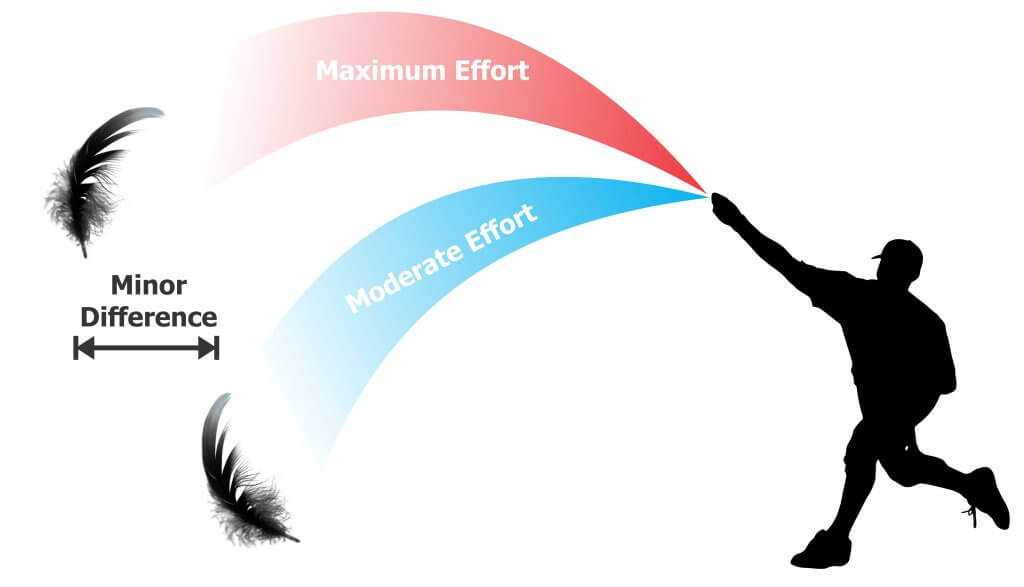
    Imagine throwing a feather. Now imagine throwing it as hard as you can. It may travel a little farther, but not much relative to the extra effort. Even then, an errant gust of wind might change its direction entirely. Similarly, we cannot rely on hydraulic pressure to propel small droplets. This is the primary reason for the “air” in air-assist spraying.

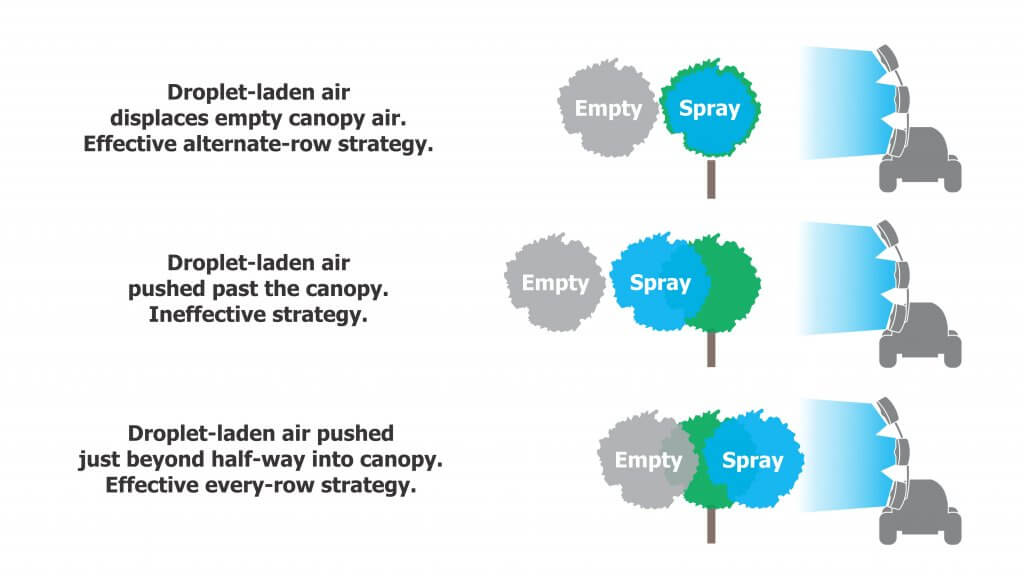
    Air-assist spraying attempts to replace the empty air within a canopy with droplet-laden air (and then get it to stay there). If we don’t have enough air energy, we won’t displace enough empty air and the throw will fall short. Likewise, if we have too much air energy, the throw will extend beyond the the target, wasting spray and likely compromising coverage. Ultimately, we want the air to expend all its energy, spreading, stalling and depositing droplets inside the target canopy.

    Travel speed

    Travel speed can have a significant impact on work rate. However, the effect of travel speed on air behaviour (and ultimately coverage) should be the sprayer operator’s primary concern. There will always be a trade-off between travel speed, coverage and work rate. Travel speed is the first and easiest adjustment to throw, spray height and canopy penetration. Just as travel speed modifies the liquid rate per row, it also modifies air energy per row.

    Environmental and canopy conditions

    Whenever calibrating or adjusting a sprayer, it is critical to do so in the crop, in environmental conditions you would typically spray in. You would not expect a sprayer to achieve the same results in high winds in a dormant vineyard as it would in calm conditions in a mature citrus orchard.

    I recommend using a handheld weather meter because local weather reports often don’t match the conditions in the planting. For temperature and relative humidity, take readings in the shade. For wind conditions, face into the prevailing wind and hold the meter as high as you can. Wind speed increases with height and we want to evaluate the most challenging part of the target – the top third of the canopy.

    Evaluating vertical air angles – Ribbon test part 1

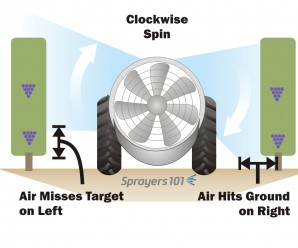
    The air angle (or direction relative to the target) is the first concern. Research has shown that low profile radial airblast sprayers without effective straightening vanes or deflectors make the air go up on one side and down on the other. In extreme situations, this might compromise the spray job (e.g. miss the lower portion of the target on one side of the sprayer) or it might simply waste spray and stir up debris. Here’s how you can see if this is happening on your sprayer:

    1. Park the sprayer in an alley between the rows.
    2. Affix 25 cm (10 in.) lengths of tape along the air outlets. Tie them to nozzle bodies or use duct tape to position them so that they stand out in the sprayer-generated air.
    3. Bring the fan(s) up to the desired speed but do not spray. Stand back behind the sprayer and use the ribbons to extrapolate the air angle relative to the target canopy. Look for asymmetries and wasted air (i.e. angled above the canopy or into the ground.)
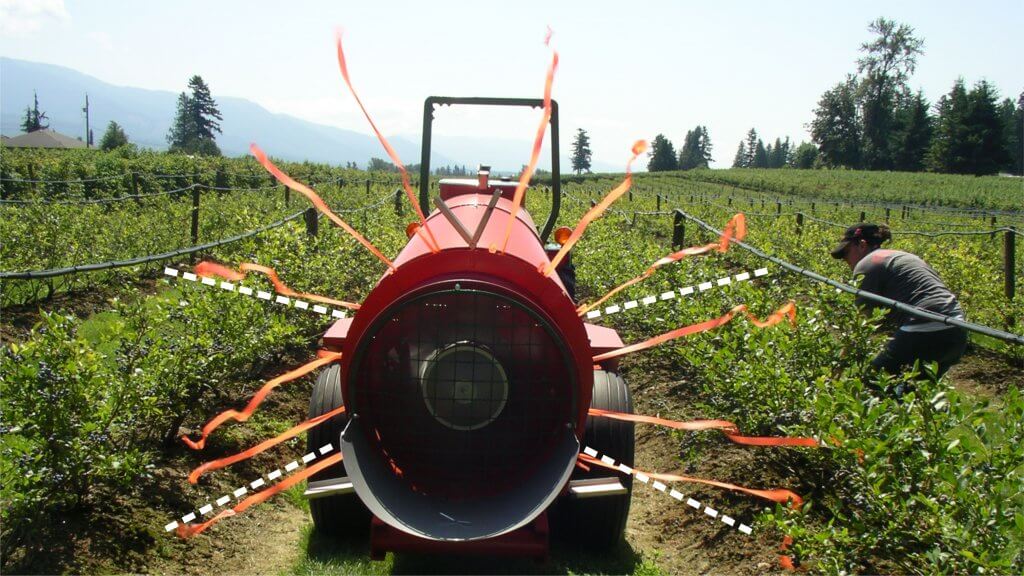
    The ribbons on the LPR sprayer in this photo are twice as long as they should be, but fortunately it was a calm day. Note the angles of the lower ribbons compared to the “ideal” broken white lines. The asymmetry corresponds to the misaligned bottom right deflector. Observe the ribbons while adjusting deflector positions. Any ribbons above the upper broken white lines indicate wasted air energy (and likely spray). Large upper deflectors, positioned horizontally, would reclaim wasted air and focus it into the crop.

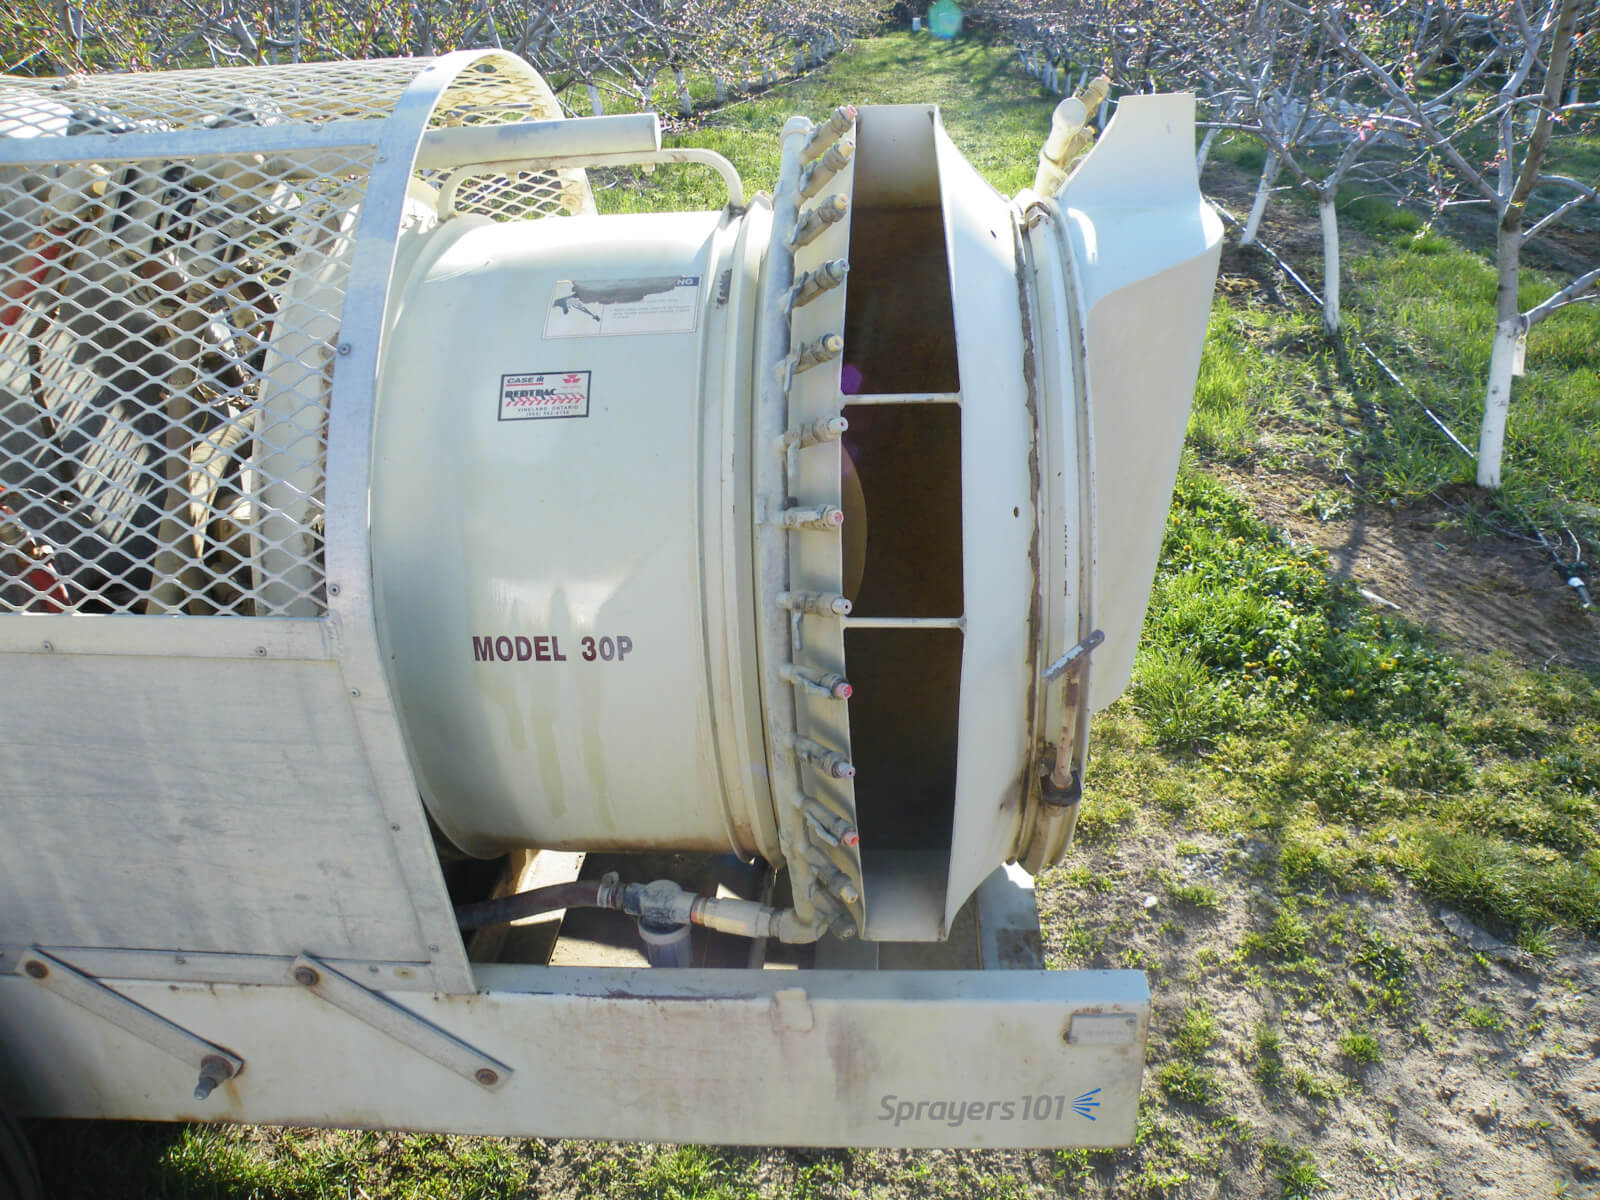
    By observing the ribbons, you can extrapolate where deflectors or fan heads should be aimed. Air should be adjusted to slightly over- and under-shoot the target canopy. For ducted outlets, such as low profile Turbomist sprayers, the air outlet is not a uniform width – it’s widest about half-way down. Using ribbons to extrapolate air direction, aim the widest part of the outlet at the densest part of the canopy. This automatically repositions the booms as well, facilitating the next calibration step where we turn off nozzles that will significantly over- or under-shoot the target. This is discussed in another article.

    Using a piece of scrap wood with a ribbon on the end to demonstrate how deflectors would channel air on a Florida airblast sprayer. Once convinced, this grower fabricated and installed deflectors and has been very pleased with their performance.
    Using a piece of scrap wood with a ribbon on the end to demonstrate how deflectors would channel air on an Economist airblast sprayer. Once convinced, this grower fabricated and installed deflectors and has been very pleased with their performance.
    When repositioning the air outlets on a Turbomist with no towers, aim the widest part of the outlet towards the densest part of the canopy, then turn off unneeded nozzles. Lubricate the nuts and bolts that hold the outlet bands tight.
    When repositioning the air outlets on a Turbomist with no towers, aim the widest part of the outlet towards the densest part of the canopy, then turn off unneeded nozzles. Lubricate the nuts and bolts that hold the outlet bands tight.

    Video Extras

    These videos are a bit long-in-the-tooth now, but the concepts are still sound. If you hear anything in the videos that contradicts what’s written in the article, go with the article. Live and learn. Thanks to Penn State, the University of New Hampshire and Chazzbo Media for producing these 2014 videos.

    This article will conclude in the second half:
    Optimizing Sprayer Air Settings – Part 2

  • Homemade Air-Assist Tower Retrofit

    Homemade Air-Assist Tower Retrofit

    It was Saturday morning in April, 2016 when I received an email from Steven Bierlink, an orchardist in Washington State. He was curious about the impact of air induction nozzles on lime-sulphur applications (intended to thin apple blossoms). Work-life balance notwithstanding, I happily grabbed a hot cup of coffee and we got on the phone. It was a great conversation.

    The top two nozzles are capped in this orchard (targeting 10' and below). It's very evident that the top two nozzles are not in use.
    The top two nozzles are capped in this orchard (targeting 10′ and below). It’s very evident that the top two nozzles are not in use.

    It turned out Steve, like many growers, also had a knack for metal working. Displeased with his Rears sprayer’s performance, he told me he’d replaced his classic radial air outlet and curved boom with a ducted tower assembly, very much like the H.S.S. sprayer had just been introduced to North America.

    I asked if he would share his story and a few photos of how he did it and he didn’t disappoint! What follows is a photo journal of how he designed and built his new sprayer. He wrote:

    “Sorry it’s taken me so long to get back to you. Spring is like a tornado and there’s just no time to get things done! Here’s a quick/not so quick rundown of the process:“

    1 – I started by cutting the horizontal supports that attach the fan box to the front deflector wall. I plugged all the old holes with nuts and bolts to keep the air going where I wanted it.

    1) Fan box cut away from deflector wall. Holes filled with bolts.
    Fan box cut away from deflector wall. Holes filled with bolts.

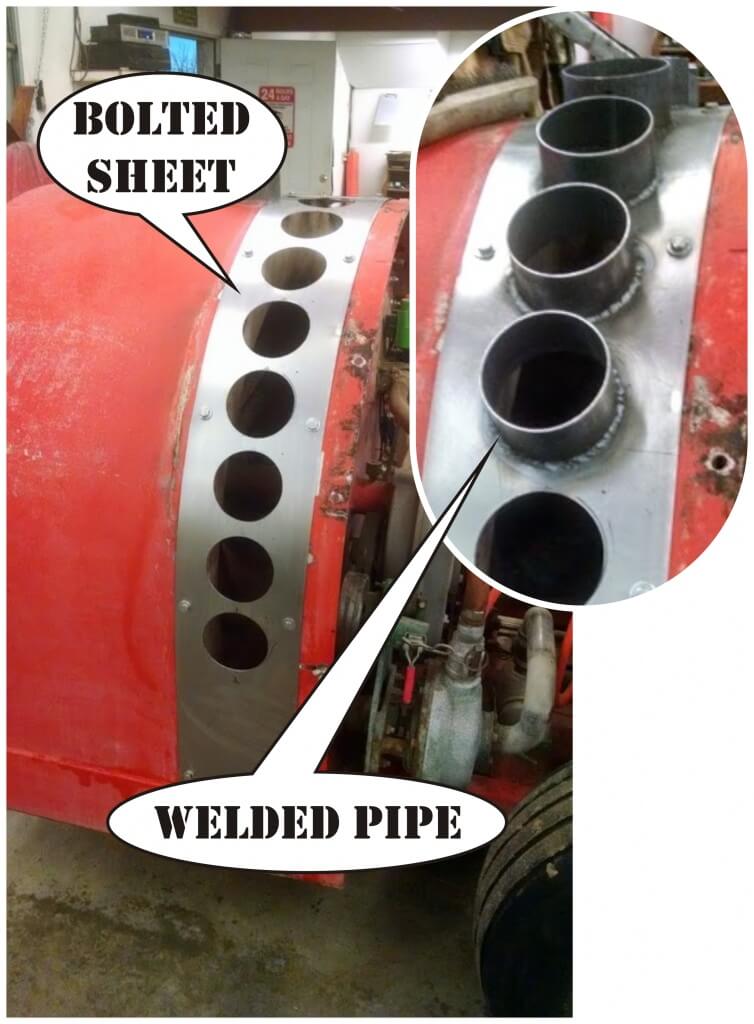
    2- I then got a 10″ wide sheet of 16 ga cold-rolled steel from a local HVAC guy. I marked out where I wanted to attach it, drilled and tapped the holes, and attached using only stainless hardware. I marked out for a total of 8 holes per side evenly spaced, and drilled them out with a 4” hole saw. I then cut 3″ long sections of 4″ diameter thin-wall pipe (about 0.125” thick) and welded them flush with the inside.

    2) Welded pipe outlets for air.
    Welded pipe outlets for air.

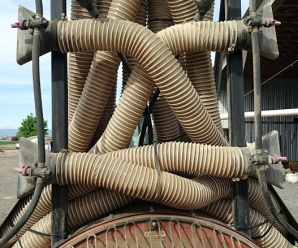
    3 – I had several conversations with the local HVAC guy about turning vanes, nozzles, cubic feet/min. and wind speeds. The reason I decided to use hose after all these conversations is because there are no 90° angle turns. Those turns during testing severely decreased wind speeds because of the turbulence it caused. The hose is standard 4″ suction hose for woodworking chip/dust collection. Together, we came up with a 1.5” x 8” outlet to use. The numbers written on the outlet are average wind speed with 10 feet of hose attached at the desired tractor rpm’s.

    3) Commercial woodshop hose and air outlets.
    Commercial woodshop hose and air outlets.

    4 – Initially I was set on having the same distance of hose for each outlet, like headers for an internal combustion engine. I let that go since volume matters so much more in this situation and there is no “real” back pressure pressure to be concerned about. This was the initial drawing:

    4) Early sketch of equal hose lengths and positions.
    Early sketch of equal hose lengths and positions.

    5 – My measured dimensions showed the rectangular tower frame would fit through my tightest V-trellis, but only if I drove 0.5 mph and who is going to do that!? So, I needed to rethink it, break it down, and redo it. I decided on a partial, center-mast design.

    5a) Original tower frame would not clear the V-trellis. A center-mast solved the issue.
    Original tower frame would not clear the V-trellis. A center-mast solved the issue.
    5b) The top of the mast can be removed and the hoses disconnected and just left to hang. This allows me to hit 12' tall V-trellis easily, as well as 14' vertical trees all the way to the top.
    The top of the mast can be removed and the hoses disconnected and just left to hang. This allows me to hit 12′ tall V-trellis easily, as well as 14′ vertical trees all the way to the top.

    6 – After putting everything together I realized the air volume wasn’t always balanced across the each outlet. This was because the bend in the hose was too sharp and too close to the outlet. This REALLY MATTERS because if the air volume is too “heavy” on one side of the outlet, it doesn’t capture and carry the spray consistently. I corrected it by attaching support rods to increase distance between bends and outlets to about 18”.

    6) Gradual angles on hose prevented uneven air from the outlets.
    Gradual angles on hose prevented uneven air from the outlets.

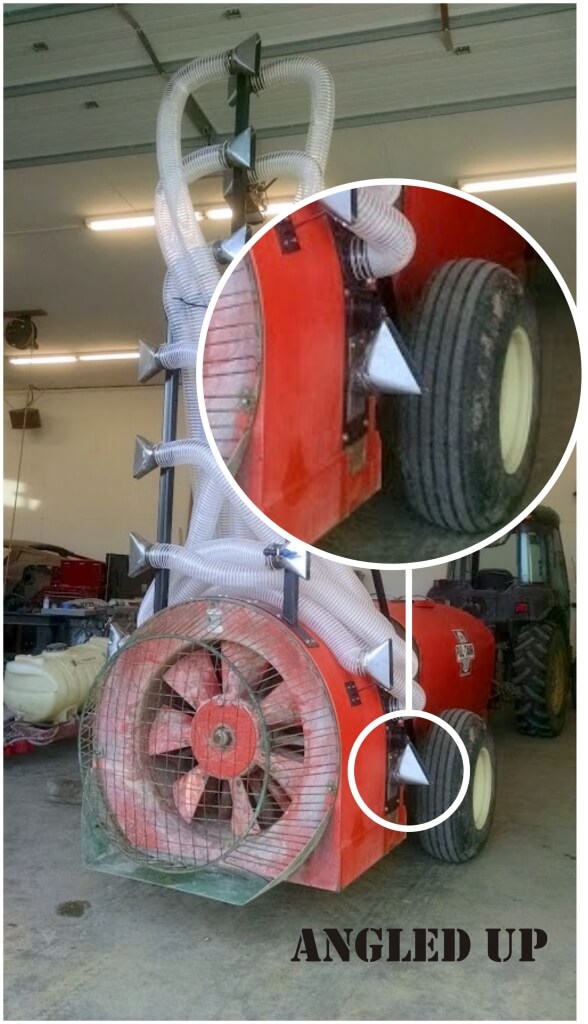
    7 – On the painted, final design, you might notice lowest nozzle is angled. This is because I’ve noticed that foliar applications don’t often hit the lowest branches. I angled one outlet upwards to correct this. I notice in your article on the H.S.S. sprayer that the Woolly Apple Aphid nozzle does the same thing. I feel like I need to meet these people; we have incredibly similar ideas!

    7) Lowest nozzle and air outlet angled up to better hit lowest branches.
    Lowest nozzle and air outlet angled up to better hit lowest branches.

    8 – I used TeeJet’s ¼ turn AIC air-induction flat fan nozzles. They’re molded into the cap, so they are always oriented the right way. I set the nozzle bodies outside the air outlets to reduce turbulence in the airflow. It also makes servicing cleaner and easier. I also ended up adding some shielding around the lower nozzles just in case someone loses focus and runs into something.

    8a) Shields prevent physical impacts to AIC (air induction) nozzles. Coverage map was created for 55 gpa in a 6'x14' vertical planting.Shields prevent physical impacts to AIC (air induction) nozzles. Coverage map was created for 55 gpa in a 6'x14' vertical planting.
    Shields prevent physical impacts to AIC (air induction) nozzles. Coverage map was created for 55 gpa in a 6’x14′ vertical planting.
    8b) Close up of nozzle location versus air outlet.
    Close up of nozzle location versus air outlet.

    I asked Steve to stay in touch and let me know how his spraying season goes with the new sprayer. I’ll add to this article as he checks in and lets us know how the sprayer holds up and what changes, if any, he wants to make in the future.

    July 2016 Update

    As promised, I checked in with Steve to see how the sprayer was holding up. Here’s what he had to say:

    “It’s awesome. Works fantastic. Very effective in windy weather without having to worry about drift. Also, it works perfectly for sunburn protectants because of how directed the application can be. It has held up well considering how many acres its gone through this year.”

    Of course, there are always a few hiccups. I’ll interject here to suggest that what Steve is about to note about thinning is not a reflection of his design. I believe many orchardists experience the same difficulties with their conventional towers, too. Steve continued:

    “A few downsides I’ve noticed throughout the season: For blossom thinning (lime sulfur), gallonage is critical to get the stamen of the flower burned sufficiently to prevent fertilization. Even when spraying ~100 gallons per acre with this sprayer, it wasn’t enough to effectively blossom-thin the fruit. Part of this may be because I’m now distributing the spray evenly through the entire canopy, rather than spraying up through the canopy below. Another downside is the droplets’ tendency to accumulate in the lower portions of the tree (since every droplet doesn’t hit foliage), and over-apply in those areas. My Sevin/NAA application this year definitely prove this theory as my lower branches were over-thinned.”

    So, what’s the final word on this cool sprayer mod?

    “Overall, it’s great, and with a few tweaks this winter will be even better.“

  • Selecting a Sprayer Pump

    Selecting a Sprayer Pump

    When I had to replace a pump on a small scale sprayer, I had a lot of questions about how they worked, their capacities, hose sizes, mounting solutions and fittings. I turned to the Pentair Hypro Shurflo catalog and found a very helpful guide on pages 2 – 10. This article summarizes the steps recommended in the catalog.

    Select Pump Style

    Sprayer pumps can be divided into two categories: Positive Displacement Pumps and Non-Positive Displacement Pumps.

    Positive Displacement Pumps

    These include Roller, Diaphragm and Piston pumps. They are self-priming and traditionally operate at high pressures. Flow from these pumps is directly proportional to the pump speed, which is why they require a relief valve and bypass line between the pump outlet and the nozzle shut-off valve.

    • Roller pumps : This is the most popular pump with farmers world-wide. The seal and roller materials should be selected based on their compatibilities with the pesticides.
    • Diaphragm pumps : These compact pumps are popular for use with abrasive and corrosive pesticides. Their oil-filled piston chambers protect the pump materials.
    • Piston pumps : Similar to car engines, these pumps are relatively low-flow and high-pressure and suited for use with handguns sprayers. The piston cup materials should be selected based on their compatibilities with the pesticides.

    Non-Positive Displacement Pumps

    These include Turbine (or Transfer) and Centrifugal pumps. They must be primed and traditionally operate at low to medium pressures, although there are models available that can go up to 190 psi. Flow from these durable pumps comes from a rotating impeller that feeds liquid through the lines instead of pumping “per stroke”. Therefore, if the outlet is closed for brief periods, the impeller spins harmlessly, so a relief valve is not needed.

    Determine PTO Pump Drive

    When selecting a pump, you must specify the shaft rotation. Hypro suggests two steps for determining the required rotation:

    1. Eyes on the End: Face the rotating Power Take-Off (PTO) and determine if it is spinning clockwise (CW) or counter-clockwise (CCW).
    2. Opposites Attract: The pump must rotate opposite to the PTO. For example, if the PTO rotates CW, then the pump must rotate CCW and vice versa.

    You should also be aware of your tractors’ horse power, and in order to determine the size of pump shaft, you should know the spline dimensions (e.g. 1-3/8″ (6 spline) pto shaft or 1-3/8″ 21-spline pto shaft).

    Determine Pressure and Flow Requirements

    In order to size the pump, you have to know the sprayer settings, such as intended application rate, average ground speed, agitation requirements, etc. Most can be calculated form the following formulae (provided in US and Metric units):

    Calculating Agitation Requirements

    • Liquids :

    Tank Volume (US gal.) × 0.05 = Agitation Requirement (gpm)
    Tank Volume (L) × 0.05 = Agitation Requirement (L/min.)

    • Wettable Powders and Flowables

    Tank Volume (US gal.) × 0.125 = Agitation Requirement (gpm)
    Tank Volume (L) × 0.125 = Agitation Requirement (L/min.)

    If the sprayer has a hydraulic agitation system equipped with a jet, it multiplies the agitation output without the need for additional flow. For example, it might have a 1 gpm input flow and boost it to a 10 gpm output. This savings should be accounted for:

    Agitation Requirement (gpm) × (Input ÷ Output) = Total Agitation (gpm)
    Agitation Requirement (L/min.) × (Input ÷ Output) = Total Agitation (L/min.)

    Therefore, if you calculate a 60 gpm requirement for agitation, and have a jet that boosts the output 3:1:

    60 gpm x (1 / 3) = 20 (gpm)

    Calculating Nozzle Requirements

    Once the agitation requirements are accounted for, you have to account for nozzles. The calculations are a little different for each sprayer, but they amount to the same thing – Total flow in US Gallons per minute or Litres per minute. Here is the calculation for a boom sprayer. For an airblast sprayer, assuming you are spraying every row, substitute “Row Spacing” for “Boom width”.

    Total Flow Requirement (gpm) = [Output (gpa) x Ground Speed (mph) × Boom width (ft)] ÷ 495

    Total Flow Requirement (L/min.) = [Output (L/ha) x Ground Speed (km/h) × Boom width (m)] ÷ 600

    When the flow requirement for agitation and the flow requirement for the nozzles have been calculated, they are added together. It is important not to under-size the pump, so always factor in an extra 20% to compensate for changes in performance (such as pump wear and slower ground speeds) and restrictions in the plumbing systems that can cause pressure drops between the pump and nozzles, as follows:

    (Agitation Requirement + Nozzle Requirement) × 1.2 = Total Flow Requirement

    Finally, be sure to account for any other flow requirements, such as tank rinsing nozzles and hose length/diameter (which causes pressure drops), and have some idea how you want to place the pump relative to the tractor and sprayer. If you prepare all this information, you can quickly and easily discuss your options with the retailer and select the pump that best suits your needs.

    For more information on various types of pumps, check out this article by Dr. Bob Wolf: